Paddle Builds
|
Let's focus on my journey making canoe paddles!
I'll provide some background, outline my process and show you each paddle I've created. When I first launched my little 20lb canoe I used an old (bent) paddle I had in my barn. It got the job done, but I quickly realised how much of a creative outlet making paddles could be. I had made two laminated paddles in recent years for family members (paddle 1, 2 in the menu system) but I wanted to explore what else was possible. I paddle mainly in small urban waterways in my hometown of Kitchener-Waterloo. My short bike ride to these lovely little lakes towing my canoe allows for many iterations of paddles to be tested. It's great fun. The waters I paddle in are fairly calm and sometimes shallow; facts that can have an impact on design. I dove in and made Paddle #3 without following any plan. It was certainly unique and it was a pleasure to use. Full build details appear in sub menus. I then started my more serious research phase and looked for any resource that could help. Naturally, I ended up with likely the most famous book on canoe paddles called "Canoe Paddles" by Graham Warren and David Gidmark. There was so much to learn. Woods at different weights and suitability for longevity exposed to water. The debate about whether to to use spar varnish or oil as a finish. The list went on. My build process is outlined further below, but if you want to jump right to the individual paddle summaries please pop open the menu above and then click the little down arrow next to PADDLE BUILDS. |
Paddles #3, 4 and 5.
Simple, Algonquin and Ottertail.

The best book on canoe paddles. You need one.
|
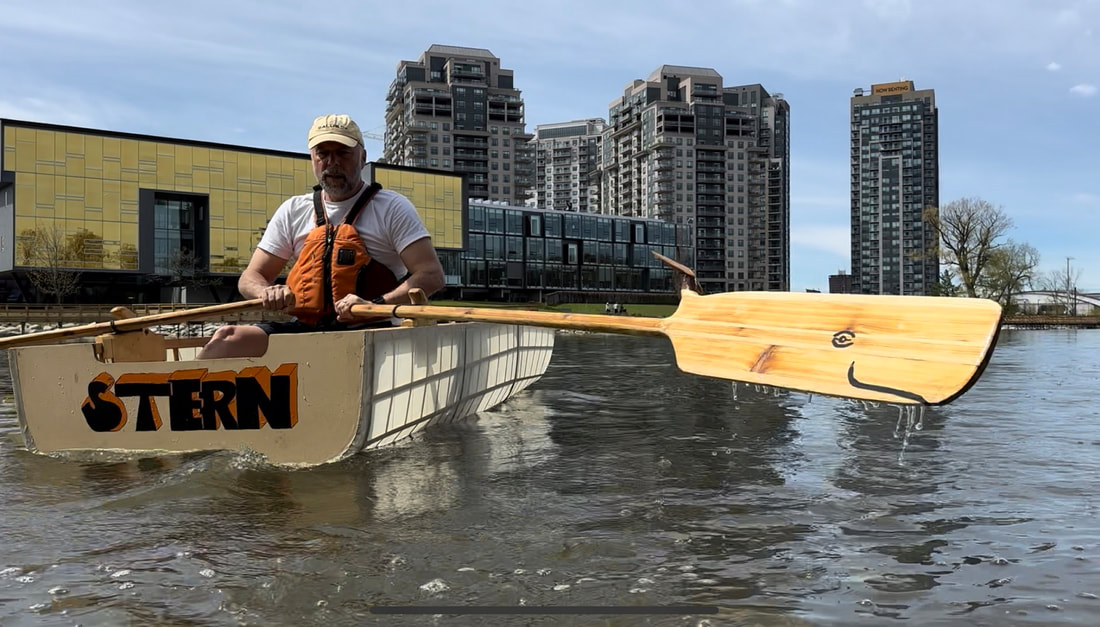
You can read all about my 20lb canoe named Pheather that I designed and built in 4 days elsewhere on this website. Check out the menu for more. And is it 20 or 21lbs? I better weigh it again! lol
|
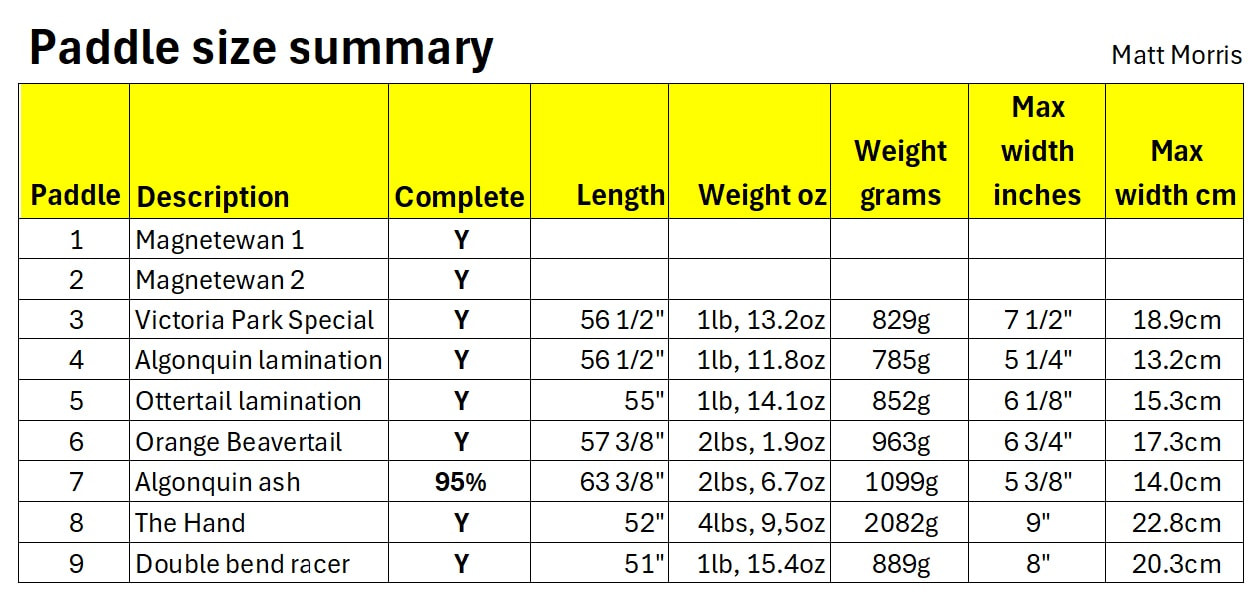
Here is a summary of my paddles so far. For details, check out the menu system and jump to the page that is of interest to you.
|
|
Beau Miles
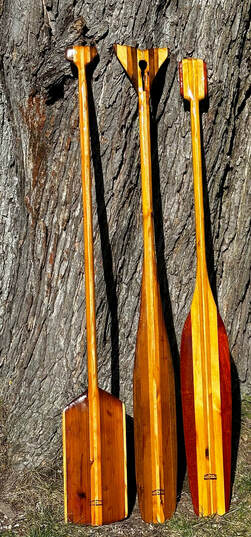
I must mention how much inspiration I absorbed from a YouTube video called Junk Paddle created by Beau Miles that follows his journey in making a paddle from scraps of wood and branches he finds on the way to his role as an educator. I evolved to a point where I made templates of the four main paddles used in North America: Beavertail, Ottertail, Algonquin and Voyageur. Please view the included picture for the different characteristics of each. The suggested dimensions are offered in the book by Warren and Gidmark. |
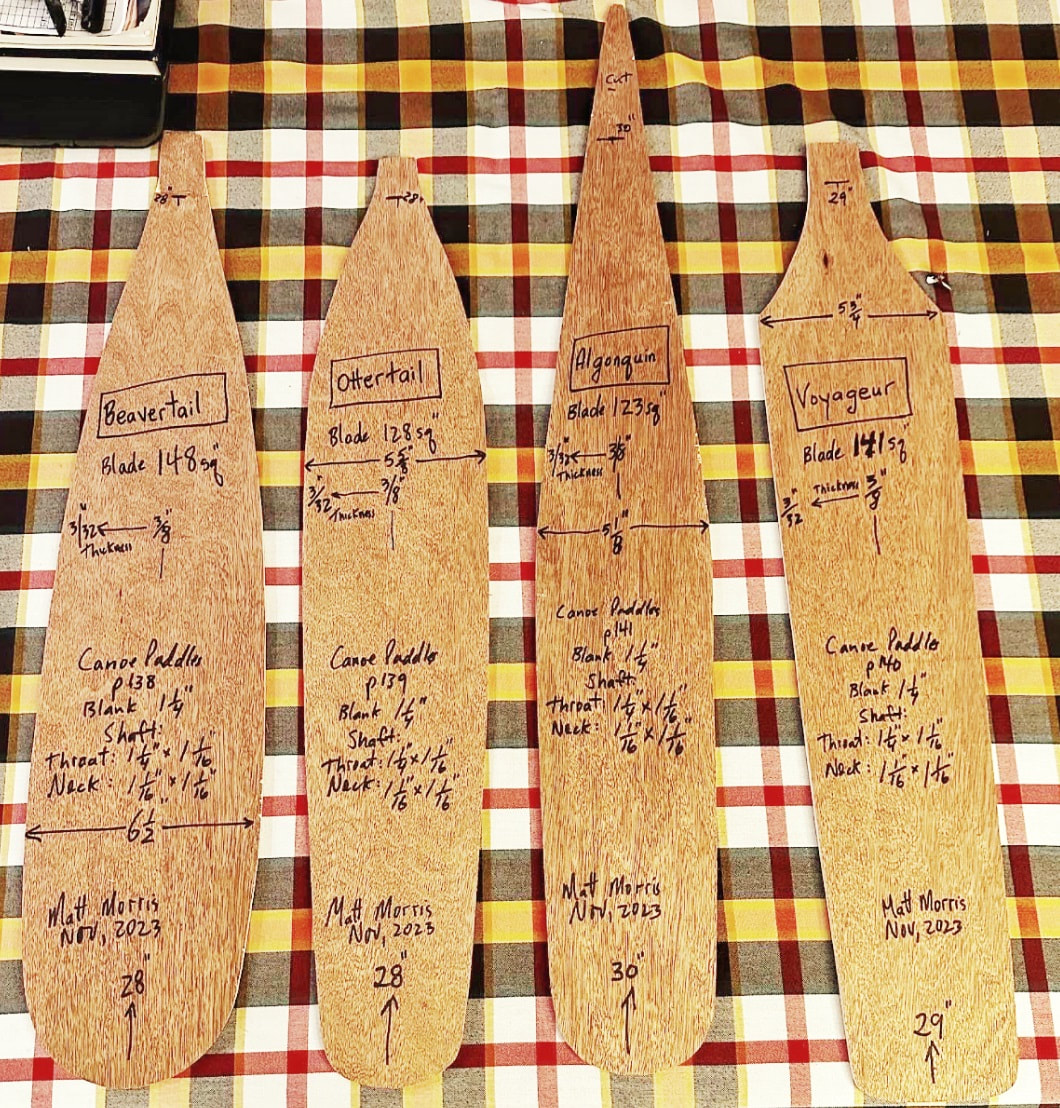
Beavertail, Ottertail, Algonquin and Voyageur!
|
|
It was time to use one of the templates I had created so I chose the Algonquin to make Paddle #4 which was great fun.
I now want to make at least one of each style and also branch out to other designs. Using the paddles is a great way to think about design and test new ideas at very low cost. Sourcing wood is also great fun. I have now used maple from the old gym floor of a High School where I taught for years. I also have some pine from a porch that the rock group Supertramp walked on. And I even have some Mahogany from my wife's grandmother's bed. I invite you to pop open the menu system at the top which will guide you to each of my paddles. It's a learning process and I'm always open to feedback. And a couple of nights ago, I dove into a dumpster to rescue a 2x8 piece of spruce. It has one big knot which will provide a challenge to deal with! (Update--it became my orange paddle!) |
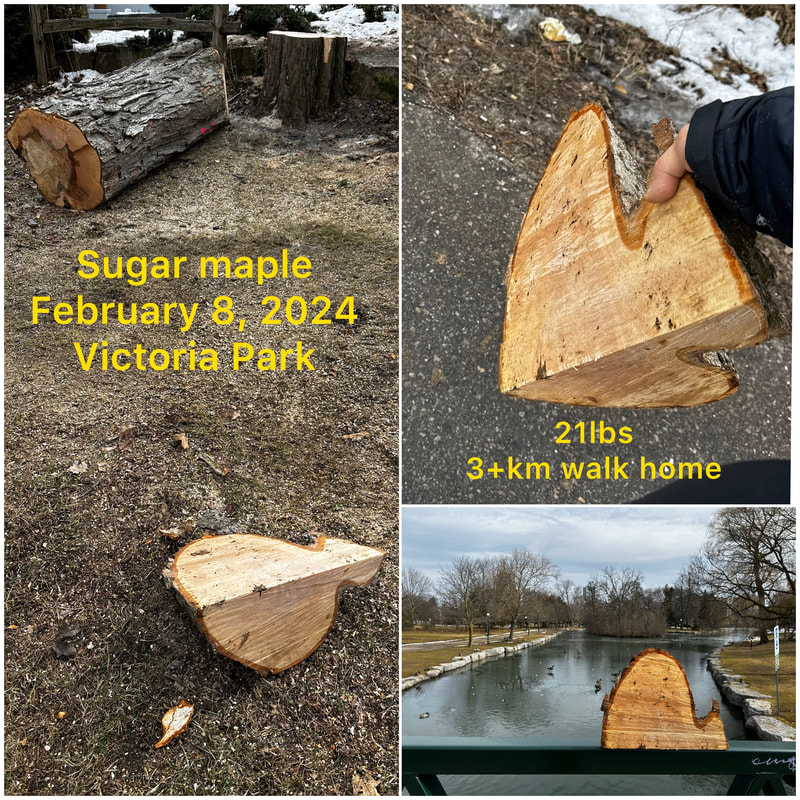
Update: Feb 8, 2024. I just carried a 21lb piece of sugar maple from Victoria Park back to our home a little over 3km away. Thank you City of Kitchener workers! At some point, it will become part of a grip for a paddle used in Victoria Park.
And I just realised that this one chunk of wood is about the same weight as my canoe!
|
Build Process
Here is my process for making a paddle. In fact, I use this summary myself to ensure I don't miss a step. This will get refined over time.
Latest update: April 11, 2024
Select wood:
Many of my paddles are laminated together from a variety of woods. Selecting the wood is one of the fun parts of the process. Am I overusing the word fun?
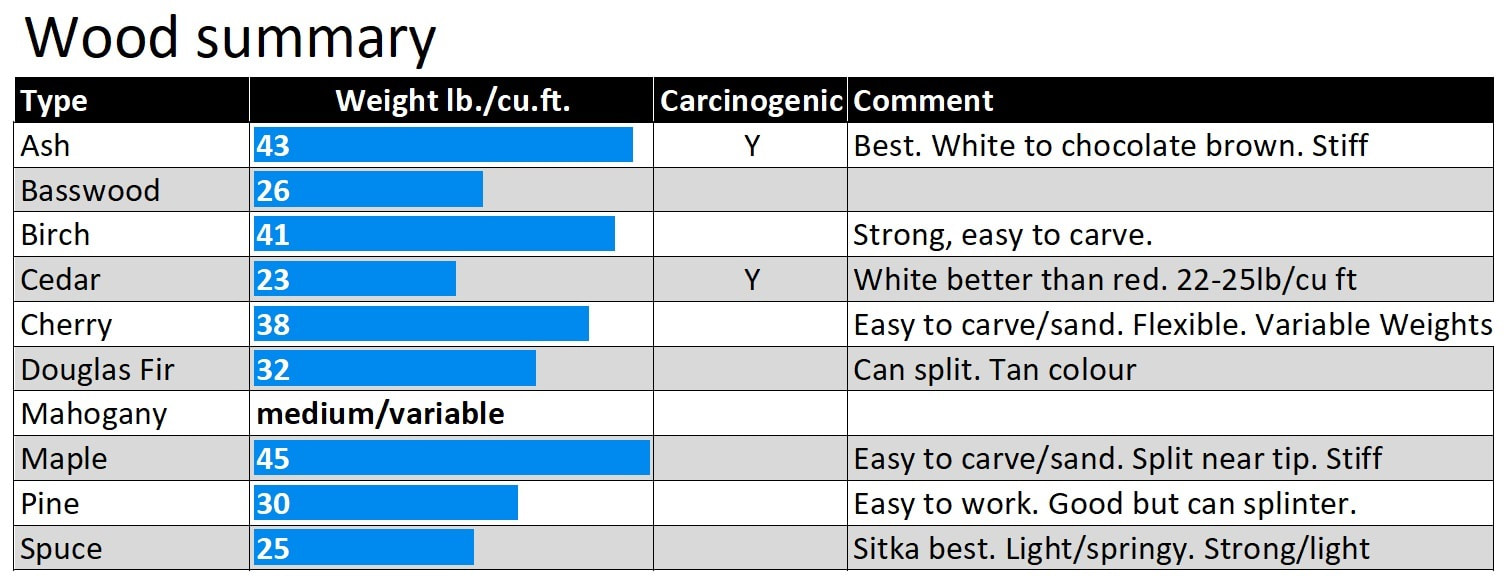
I treat wood a bit like a knitter treats their stash of wool. In fact, some knitters don't call it a stash but rather a 'curated collection'. This makes sense to me. So sometimes I'll just collect interesting pieces of wood and then batch process them into potential paddle stock. This involves work with the table saw. I always lay a big blue tarp under the table saw on my driveway as this makes cleanup so much easier. Below is a table of common woods used in paddles. Source: Canoe Paddles by Graham Warren and David Gidmark.
Latest update: April 11, 2024
Select wood:
Many of my paddles are laminated together from a variety of woods. Selecting the wood is one of the fun parts of the process. Am I overusing the word fun?
I treat wood a bit like a knitter treats their stash of wool. In fact, some knitters don't call it a stash but rather a 'curated collection'. This makes sense to me. So sometimes I'll just collect interesting pieces of wood and then batch process them into potential paddle stock. This involves work with the table saw. I always lay a big blue tarp under the table saw on my driveway as this makes cleanup so much easier. Below is a table of common woods used in paddles. Source: Canoe Paddles by Graham Warren and David Gidmark.
Design:
Another fun part of the process is laying the wood out on an uncluttered workbench to play with potential looks. If a template is being used I often lay it down first so that I can see how the critical outer piece of the blade works on the edge. I wouldn't want a thin sliver of wood on only part of the edge. Or would I?
Plane wood:
Sometimes I'll use a hand power planer but sometimes I just give the true cut from the table saw a little sanding (120 grit) with the orbital sander.
Set up clamps:
I have 4 pipe clamps that are key to adding pressure to the blade so the glue can dry properly. I place a piece of parchment paper over the pipes to reduce glue drip trouble.
I'll mention here that I clamp the spine separately from the blade. I simply put together the long pieces with lots of glue and lots of clamps and then let it dry. The remaining process focuses on the critical blade and grip build.
Test fit:
I lay in the spine and blade pieces without glue. I also place an extra piece of hardwood on the outside edges of the blade which allows the pressure of the clamps to spread over a larger section of the blade. I then adjust the clamps to almost fit. This reduces large movements just before the actual tightening process. The test fit also ensures that each pair of surfaces awaiting glue have a good fit. If gaps are seen, more refinement of at least one edge will be necessary. I also ensure that I have paper towel at the ready for drip control and wiping of hands.
Nitrile gloves are a good idea too.
Lots of glue:
I apply Titebond III waterproof glue and ensure good coverage. There is some debate whether this glue is waterproof or water resistent. I have never had an issue with Titebond III.
I want to see 'glue squeeze out' upon compression via the clamps. I do not apply glue to the two extra pieces of wood on the outside of the blade. Again, those pieces are only there to help spread the pressure coming from the clamps. They fall away once the clamps are released.
Tighten clamps:
I tighten the bottom clamp lightly first, ensuring that the wings of the blade are centered on the spine. I then go to the other end of the blade and tighten it while again ensuring good alignment of the various pieces onto the spine. I then gradually tighten all of the clamps and add a few more for good measure.
I then leave it in a warm area for 24hrs followed by release. Although it is often said that clamps can be removed after one hour, I have left mine on for the entire dry cycle.
Trace design and jigsaw:
I will have already chosen the design. Now I trace the pattern using my template and use my jigsaw to cut it out. A bandsaw would be easier and more accurate. I leave a larger margin of wood near the cut line than a bandsaw but it’s easy to take it down later.
Guide line:
It is important to draw a line down the middle of the paddle edge. By doing this, you always know where the center of the edge is and can plane down towards this line from both sides. I use a little centering jig I created to make this a quick process.
|
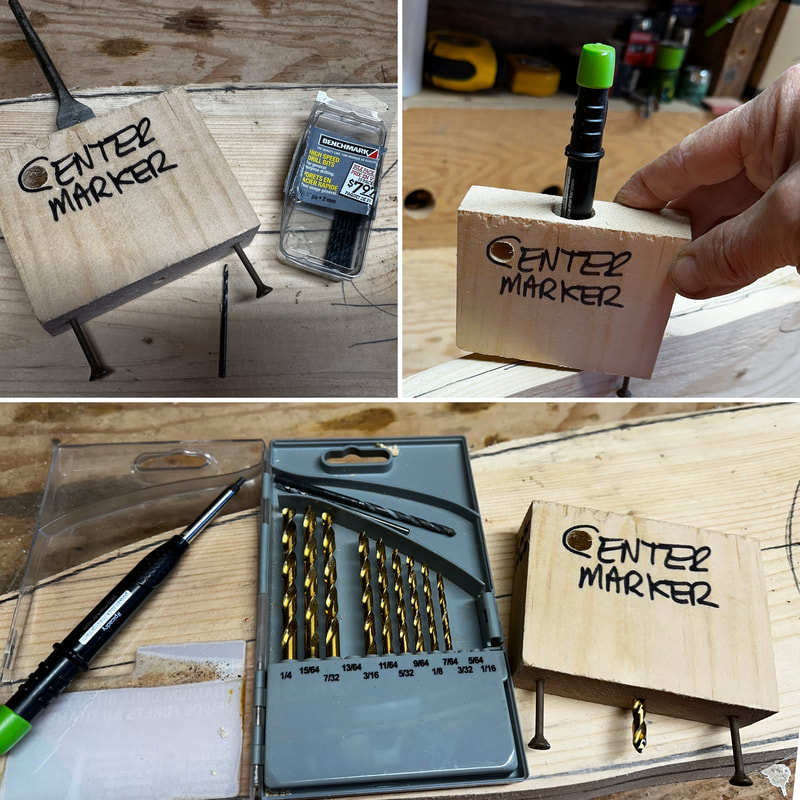
Centering jig:
The 13/64" drill seems to match the tip of the Pica-Dry Mechanical Pencil perfectly. I drill a 3/4" hole halfway through the block and then let the 13/64" bit finish the job. The Pica pencil then gets pushed through. My two long screws are predrilled with a 2mm (tiny) drill to ensure the wood does not split. My long screws could be replaced with long finishing nails for a more accurate fit. Attempt to drive them in straight. Using the jig is a simple process. Place the jig on the edge of your paddle blank and then twist it until the two screws (or nails) touch the paddle. Next, simply pull the jig along. The important point is to mark the center line before you start removing wood! You don't want a lopsided paddle! |
|
Remove wood:
Now it's time for dramatic removal of wood. I've used a hand power planer set to maximum removal. I've also used an aggressive disk on a grinder. On all tools, safety is crucial. You are responsible for ensuring you follow all recommended safety precautions. In addition to the previous statement, I put extra emphasis on ear protection. I'm getting old and need to protect my hearing!
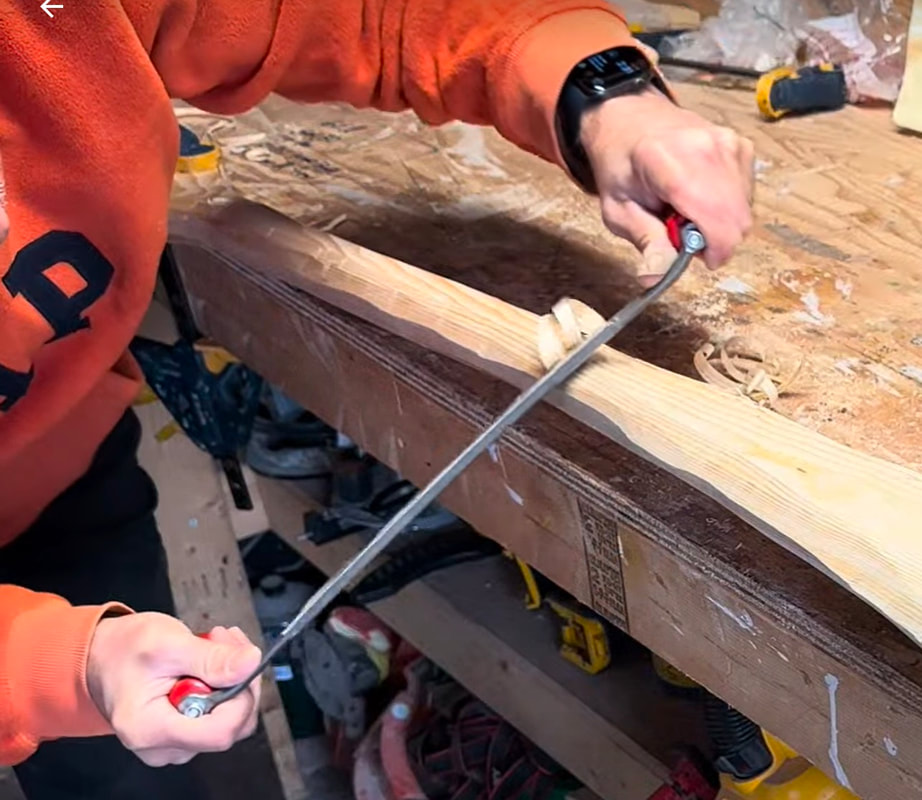
More recently I've used a draw knife which is very satisfying.
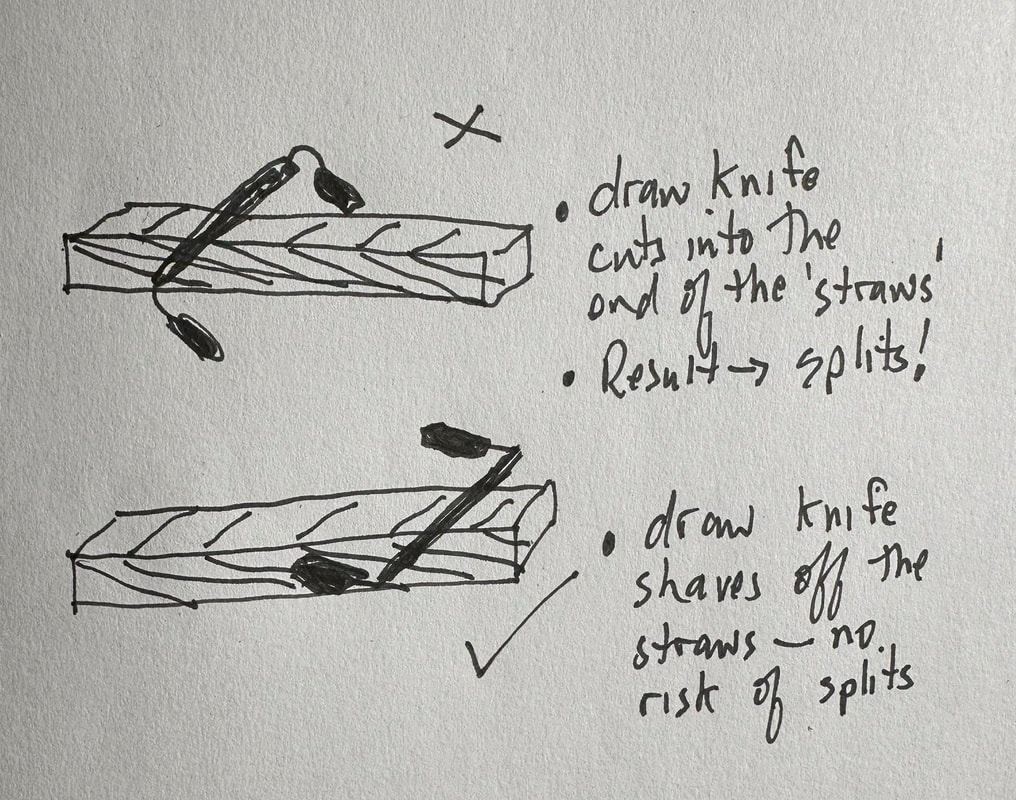
Grain direction is key to understand here. Think of wood grain as a collection of plastic straws on an angle. You want your blade to slide along the grain. Avoid cutting into the end of the straws. I've included a little drawing below to attempt to show how this risk can be avoided.
Now it's time for dramatic removal of wood. I've used a hand power planer set to maximum removal. I've also used an aggressive disk on a grinder. On all tools, safety is crucial. You are responsible for ensuring you follow all recommended safety precautions. In addition to the previous statement, I put extra emphasis on ear protection. I'm getting old and need to protect my hearing!
More recently I've used a draw knife which is very satisfying.
Grain direction is key to understand here. Think of wood grain as a collection of plastic straws on an angle. You want your blade to slide along the grain. Avoid cutting into the end of the straws. I've included a little drawing below to attempt to show how this risk can be avoided.
|
If you study the grain direction of your wood you might be able chose which direction to pull the draw knife to limit tear out or splits. Of course with multiple pieces of wood in the blade you might have competing priorities! Using a power tool largely avoids this issue.
|
Sanding:
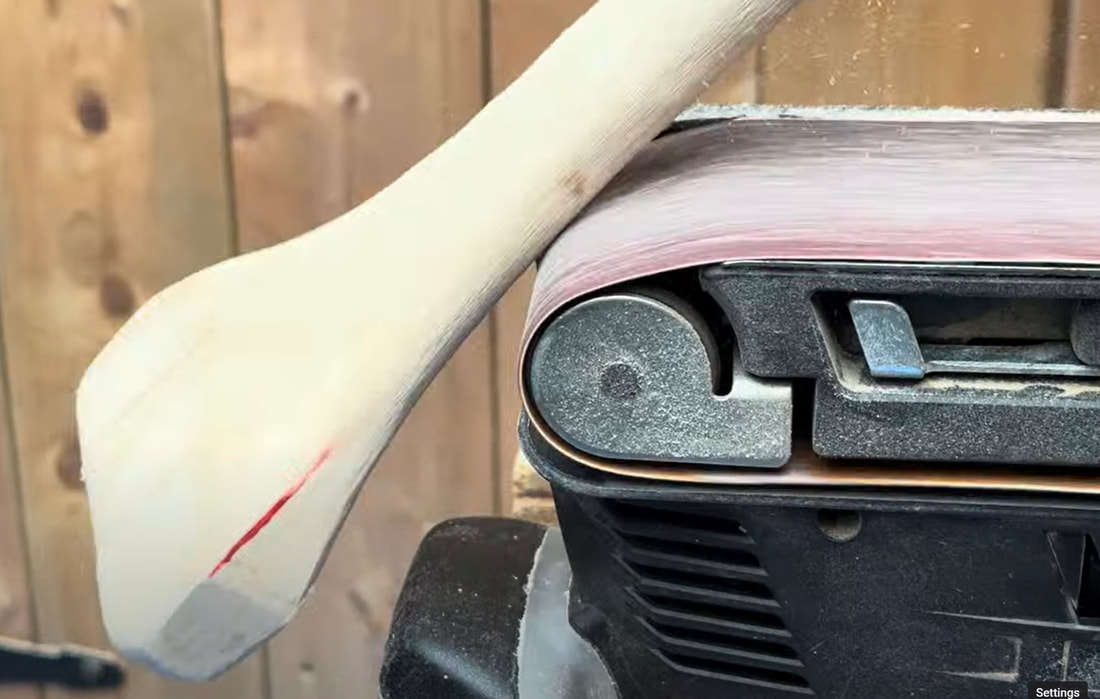
At some point you will know that it's time to move to sanding. I've used a belt sander mounted upside down on a bench but more recently I seem to stick with an orbital sander with an 50 grit paper attached. It's satisfying to see the shape start to show it's beauty. If using an orbital/oscillating sander, don't forget to empty the collection bag! Or perhaps you will connect it to a vacuum system. Some woods (eg. cedar) are carcinogenic (see chart above) so lung protection is a must. Do it!
When sanding the shaft place one end on the ground and then rotate the shaft slowly as you vigorously move the oscillating sander up and down the shaft. All of these motions will help even out the shape and give it a smooth overall look. Stop, step back and observe process many times. The eye is a wonderful tool to see imperfections. An uncluttered nutral background helps your eye observe without distraction.
Once I'm satisfied with the shape, I work up to 150 or maybe 220 grit sandpaper.
For best results keep the paddle moving. You will feel it! Stand back regularily and observe progress.
Branding iron:
If you get serious enough, you can have a brand made for a reasonable price. Delivery time can be a month or so. You simply heat the brand with a blow torch, test brand a scrap of wood and then apply it to your paddle. You will learn to gently rock the brand in all directions while not staying on the wood too long. A tricky process. I've had to resand a brand and try again. If you do this, be careful not to create an indentation at the center of the brand as rebranding would leave an untouched central spot.
Epoxy blade tip and fiberglass:
This topic is something I need to experiment with as an epoxy tip is going to increase the durability of the paddle. I've chosen not to fiberglass my paddles for extra stength as all of my paddling is done in calm urban waters. I am not risking being stranded in the middle of a large lake. I'm also willing to do a little touch up as necessary.
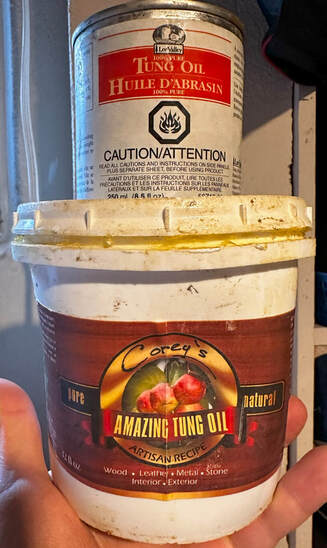
Spar varnish or tung oil:
I'll let you read about the raging debate on this issue. I seem to be in the spar varnish (urethane) camp (about 5 THIN coats) as I like the beauty of the final paddle. The exact number of coats will depend on many things including the type of wood being used, temperature and thickness of coat. Ultimately your keen eye will determine when it looks both completely sealed and beautiful.
I'll let you read about the raging debate on this issue. I seem to be in the spar varnish (urethane) camp (about 5 THIN coats) as I like the beauty of the final paddle. The exact number of coats will depend on many things including the type of wood being used, temperature and thickness of coat. Ultimately your keen eye will determine when it looks both completely sealed and beautiful.
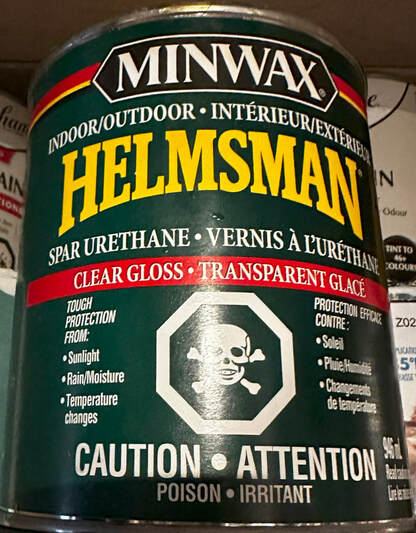
Many speak of Spar Varnish. This product is called Spar Urethane and has worked very well for me. I apply about 5 light coats.
|
|
I think it important to quote from page 112 of "Canoe Paddles" by Graham Warren and David Gidmark, "...show paddles and canoes, built exclusively for looking at rather than for using, are rather sad and soulless".
So there you have it. This is my process today. I'll update this over coming years as I learn more.
|
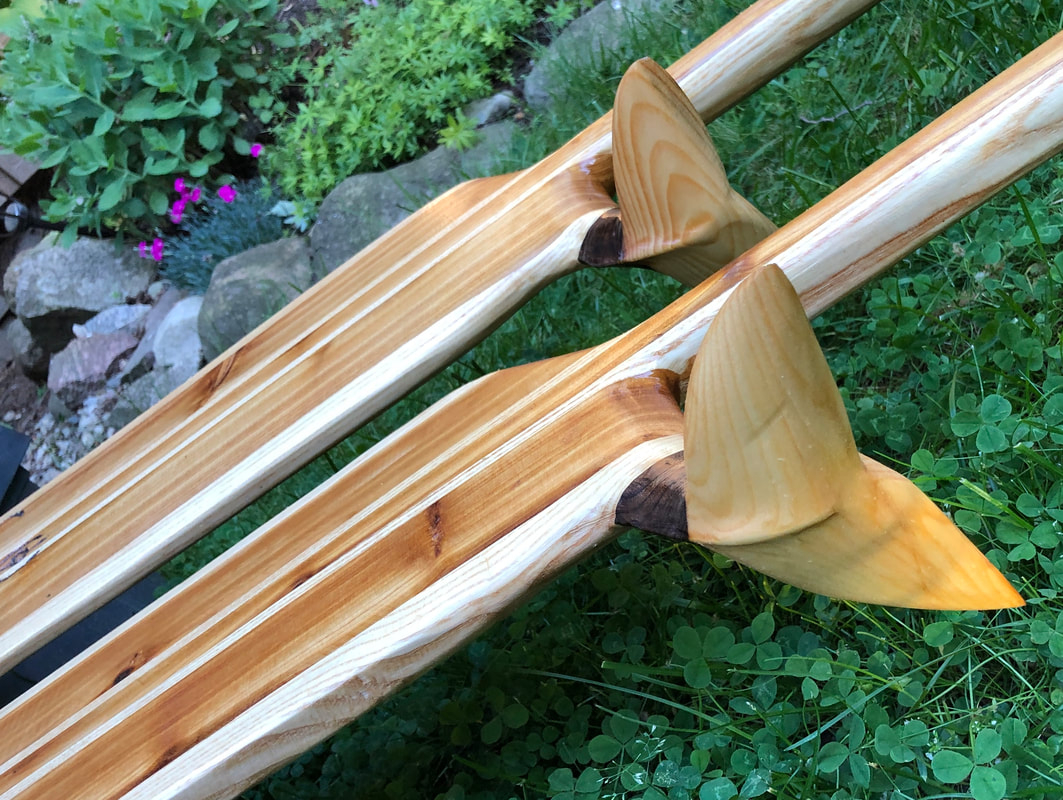
Bonus:
Oars for my UB1000 rowboat I've made two sets of oars for my rowboat. The first set was thrown together from an old 2x4 and and a few scraps. The second set was made to look like sperm whales including flukes. The idea is that the oars will appear to breach like a whale on each stroke. This has resulted in many interesting discussions with curious onlookers. 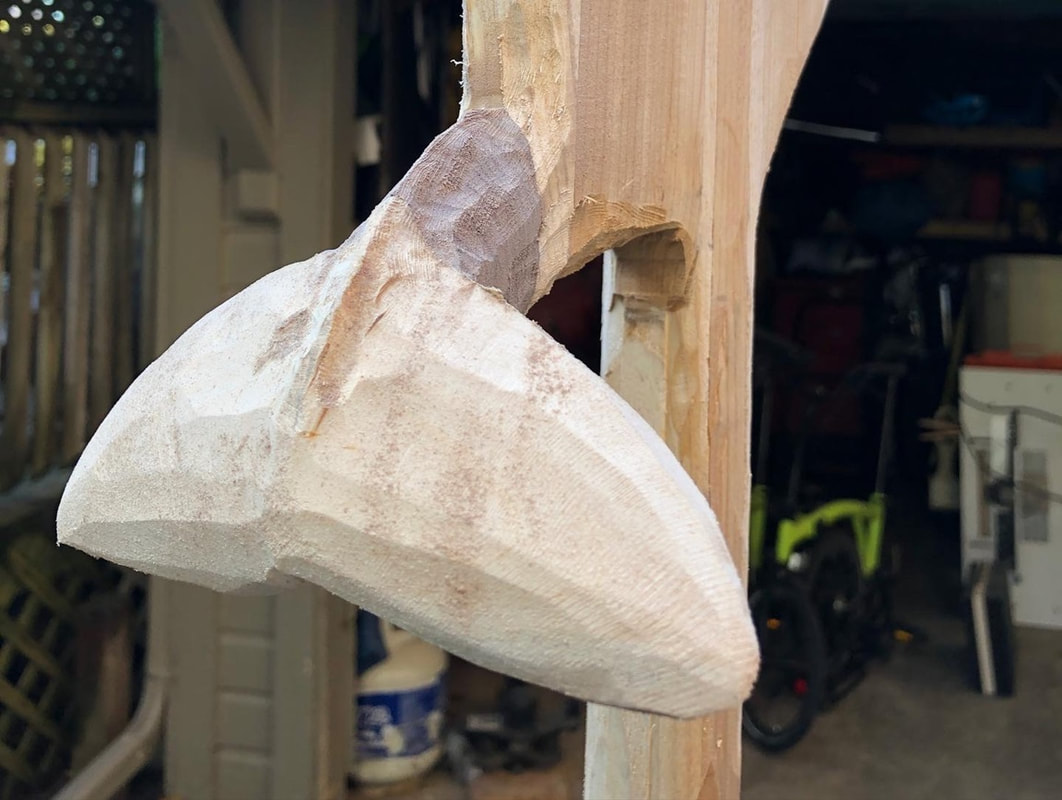
The carving process

|
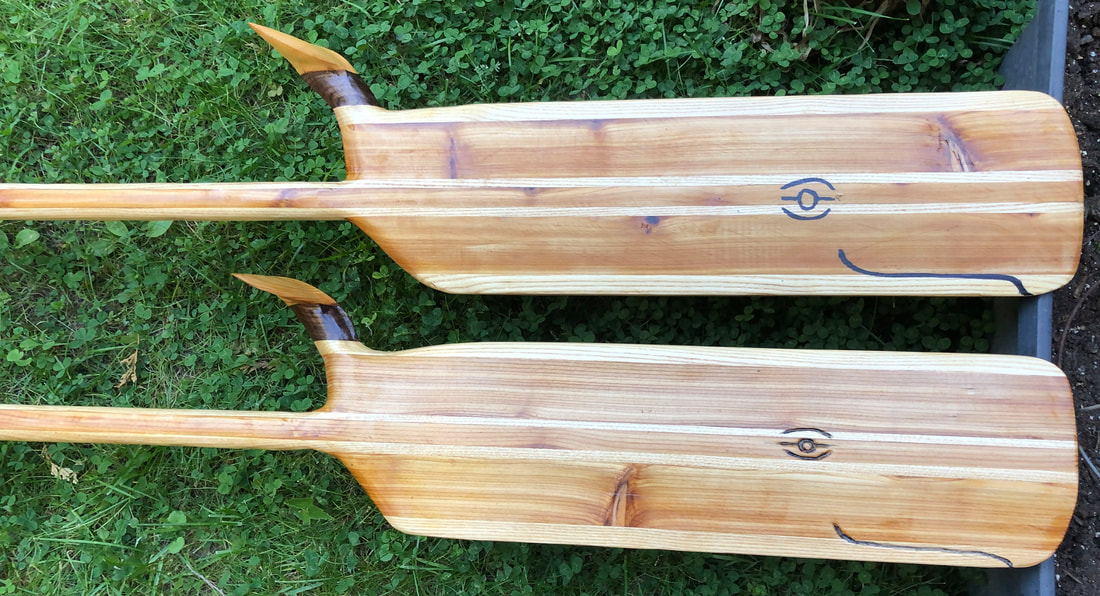
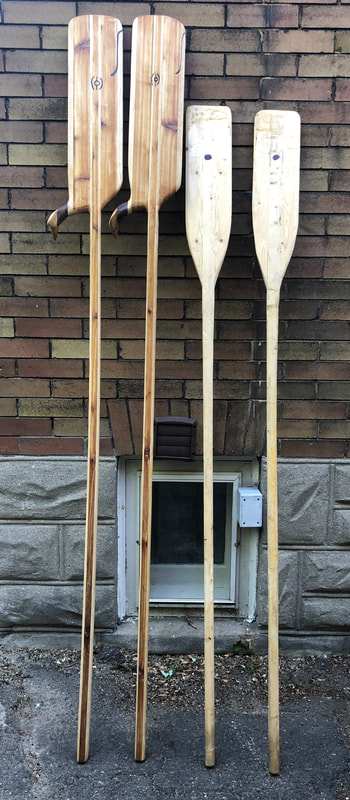
The new (and longer!) oars next to the 'quick oars' to get me moving. What fun! The new oars were mostly cedar with some ash to reinforce. The fluke had some pine and black walnut. And yes, the rock group Supertramp had walked on the pine.
|