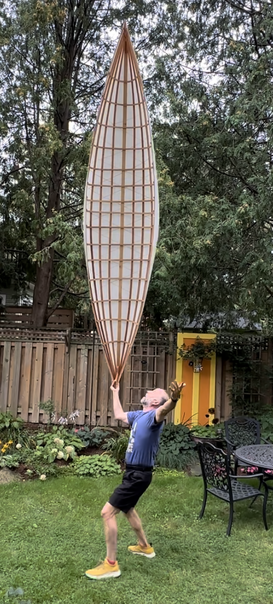
Pheather! A 20lb skin-on-frame canoe!
|
|
Hi there! I’m Matt Morris in Waterloo, Ontario.
I built Pheather in 4 days in the fall of 2023.
Let's begin this summary by looking at the overall process.
The 5 phases to build my canoe:
Phase 1:
Planning and designing what to build.
My UB1000 rowboat is great fun but I realized that I wanted to look forward as I paddled. I also wanted to make a super light boat. And I was still committed to calm urban waters only.
Could I design a canoe that was 12' long and still under 20lbs?
Could I also include significant tumblehome so that my hands would not hit the gunwales when paddling?
Could I make it with far fewer stations for the build? Maybe 5 instead of the usual 10-15?
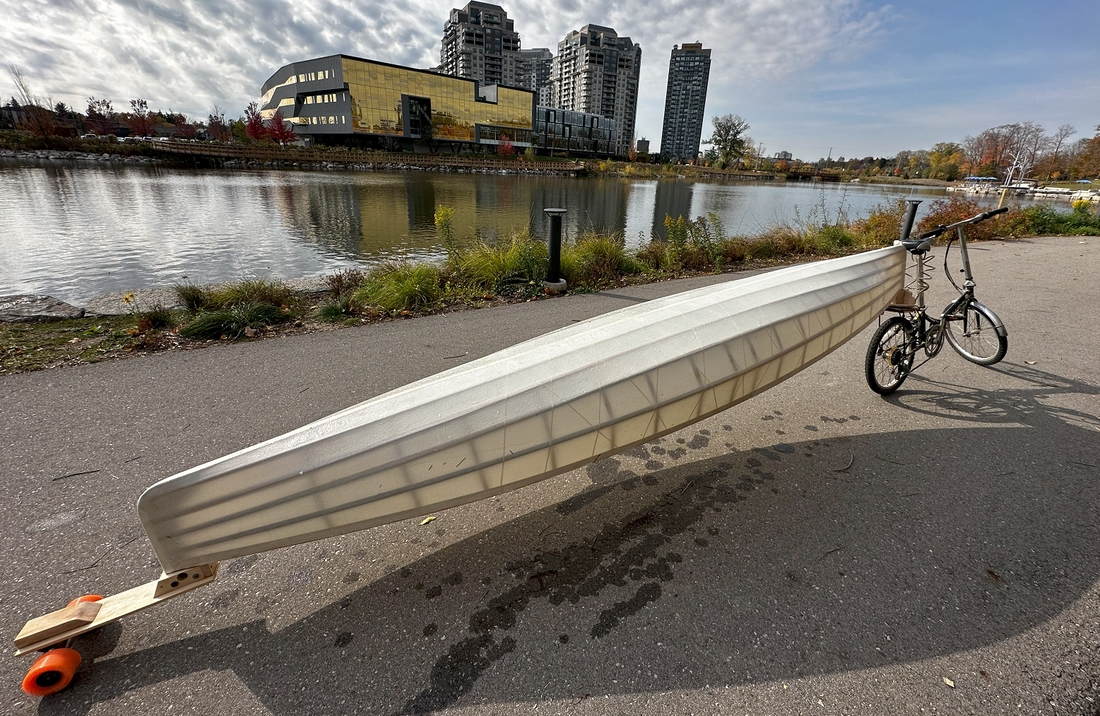
Could I build it in such a way that it could become a trailer--a canoe that could be towed by bicycle to urban waters?
I started studying every boat I could find and got comfortable with the key measurements:
Length
Width
Height
Rocker. How the keel curves up at both ends.
Sheer line. The orientation of the top edge of the boat.
Waterline. Key to initial stability.
Gunwale width
Tumblehome. More tumblehome means the side of the canoe bends in towards the paddler at the gunwales. More tumblehome reduces the likelihood of knuckle smashing on each stroke.
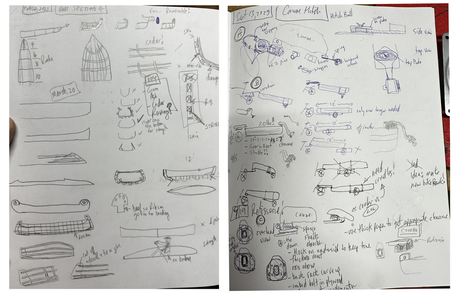
The design of the boat came gradually over time with lots of rough drawings to play with ideas.
I built Pheather in 4 days in the fall of 2023.
Let's begin this summary by looking at the overall process.
The 5 phases to build my canoe:
- Planning and designing what to build
- Gathering materials
- Pre-build preparations
- Build
- Testing and adjusting
Phase 1:
Planning and designing what to build.
My UB1000 rowboat is great fun but I realized that I wanted to look forward as I paddled. I also wanted to make a super light boat. And I was still committed to calm urban waters only.
Could I design a canoe that was 12' long and still under 20lbs?
Could I also include significant tumblehome so that my hands would not hit the gunwales when paddling?
Could I make it with far fewer stations for the build? Maybe 5 instead of the usual 10-15?
Could I build it in such a way that it could become a trailer--a canoe that could be towed by bicycle to urban waters?
I started studying every boat I could find and got comfortable with the key measurements:
Length
Width
Height
Rocker. How the keel curves up at both ends.
Sheer line. The orientation of the top edge of the boat.
Waterline. Key to initial stability.
Gunwale width
Tumblehome. More tumblehome means the side of the canoe bends in towards the paddler at the gunwales. More tumblehome reduces the likelihood of knuckle smashing on each stroke.
The design of the boat came gradually over time with lots of rough drawings to play with ideas.
|

|
In the end I chose 31” for the widest point, just under 12’ for the length (that would allow me to avoid buying lumber longer that 12’), zero sheer as the boat did not need to break through waves and the decision would help with the minimum weight goal. Minimal rocker meant it would track straighter. I then started roughing out the largest (central) rib. I wanted good stability and tumblehome.
Once roughed out, I started to build a little cardboard model and eventually transferred the plan to a very small wooden model to see if I liked it. I was originally thinking of building a sturgeon-nosed canoe (also known as a Kootenay) to minimize weight but eventually decided to go for a more traditional front end. This more traditional front end decision became important as it allowed my trailer design to work.
Once roughed out, I started to build a little cardboard model and eventually transferred the plan to a very small wooden model to see if I liked it. I was originally thinking of building a sturgeon-nosed canoe (also known as a Kootenay) to minimize weight but eventually decided to go for a more traditional front end. This more traditional front end decision became important as it allowed my trailer design to work.
The small wooden model actually had a kootenay front.
|
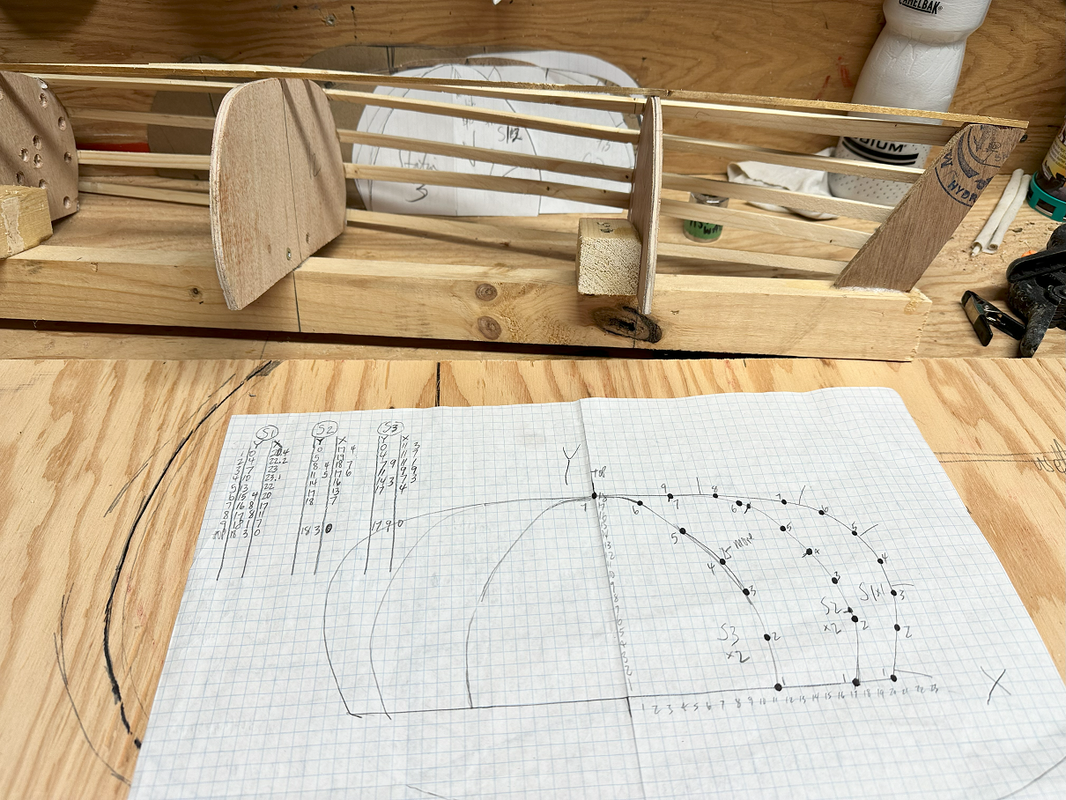
Here is my calculation sheet where I upsized my model to full canoe dimensions.
|
|
Phase 2:
Gathering materials. In this phase I was mainly purchasing materials: 9oz dacon, two part urethane to coat the dacron, wood and epoxy. I found two sources locally of non kiln-dried ash that was best for bending. The quality of the cedar was important too and I found a great source at Pacific Cedar. I purchased 2 boards 12’ long. Grain orientation is also key and sometimes debated. Note the picture where I cut the ash board so that the grain was line up. 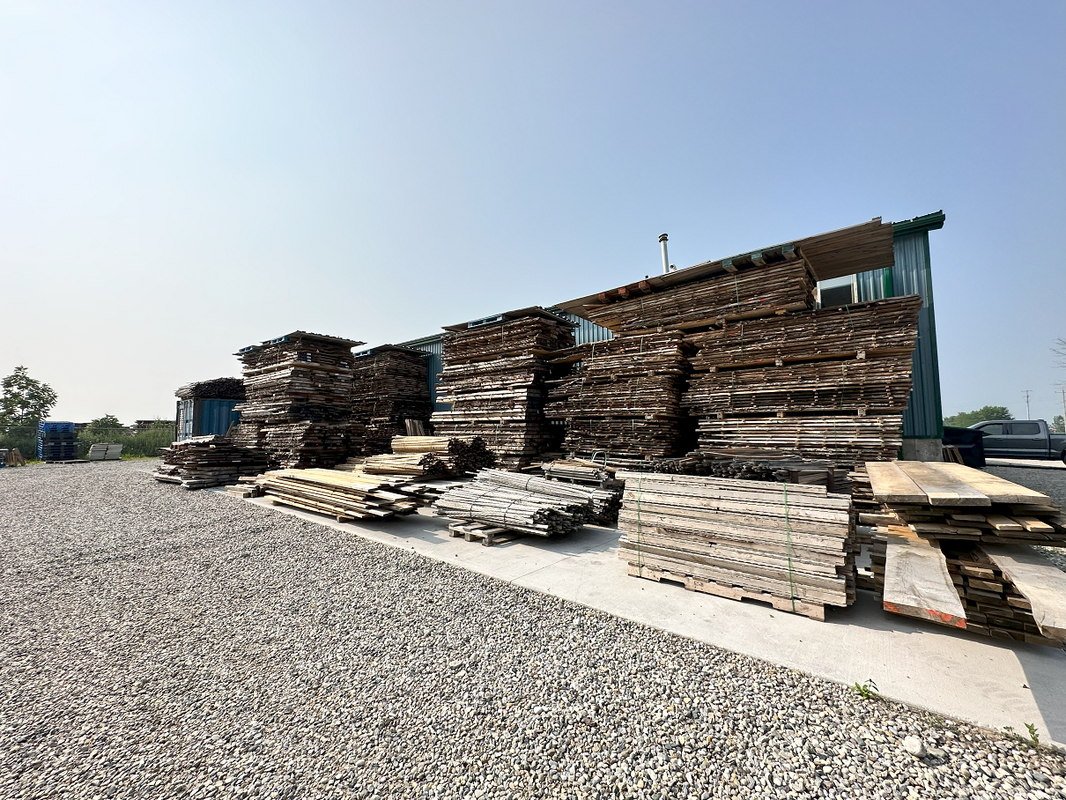
I was able to source some ash wood prior to it going into a kiln. This capture meant that I was more likely to have success with the steam bending process. Straight grain and knot free was also a key consideration.
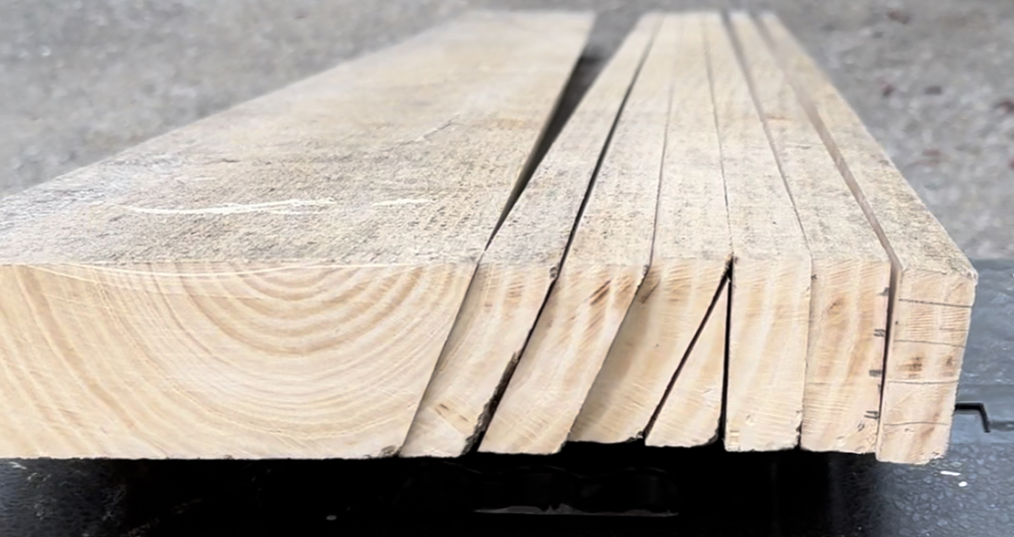
Are are 7 cuts. Can you guess which one 'didn't make the cut'?
Yup, it's the little triangle. Cutting this way meant the grain was lined up consistently on each piece. Next it was cut and planed to size and then put in the cistern for a number of days to hydrate.
|

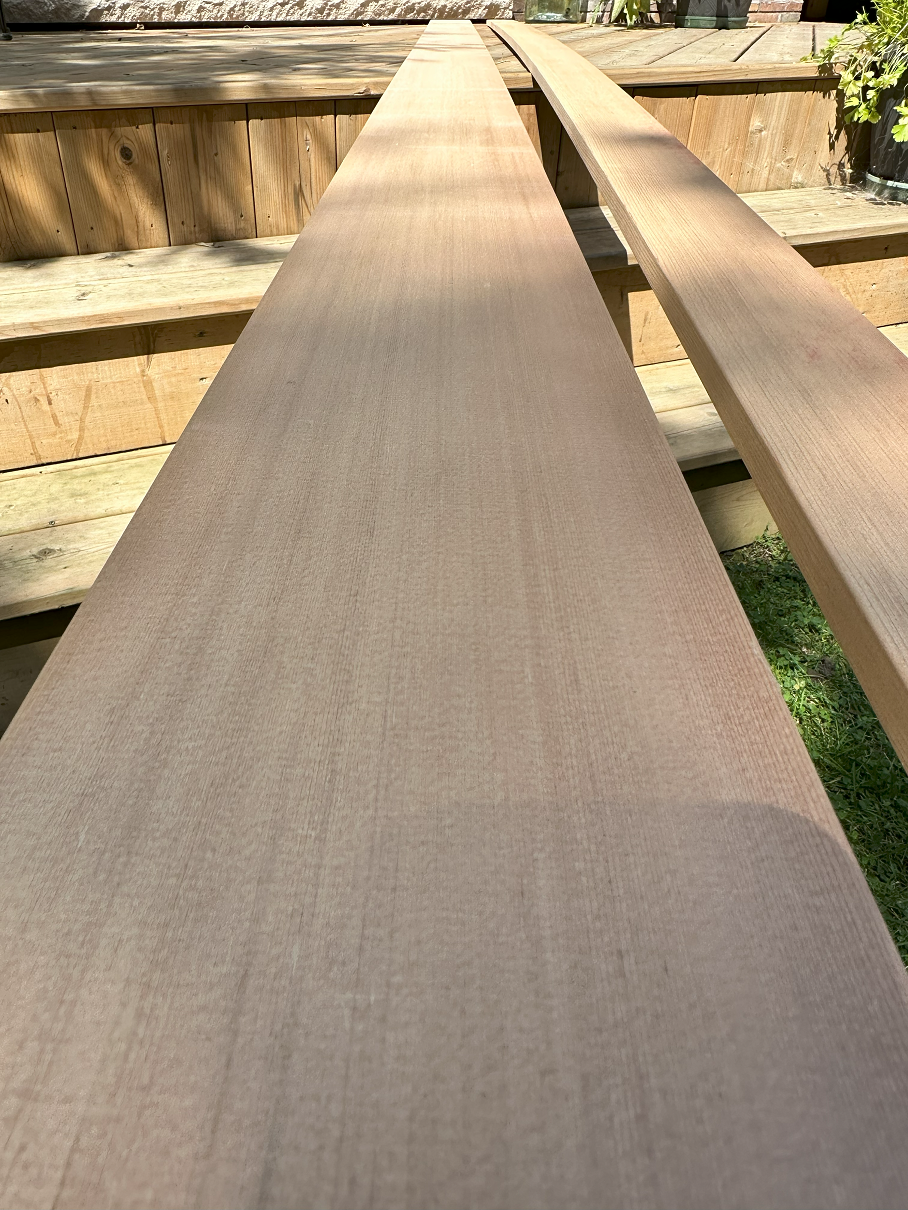
Two beautiful western red cedar boards. Straight grain, zero knots.
|
Phase 3:
Pre-build preparations.
The ash needed to be ripped down (and planed) to the required size so that it could be soaked in our cistern for a number of days. Later some of the ash would be scarfed (two shorter pieces joined together) for the keel and gunwales.
For the cedar, I ripped it to size and sanded them ready to become stringers.
I also bought two super straight 12’, 2 x 4’s and a sheet of ¼” particle board. Then with a couple of stray 2 x 4’s I had my 5” wide by 12’ long strongback ready to go.
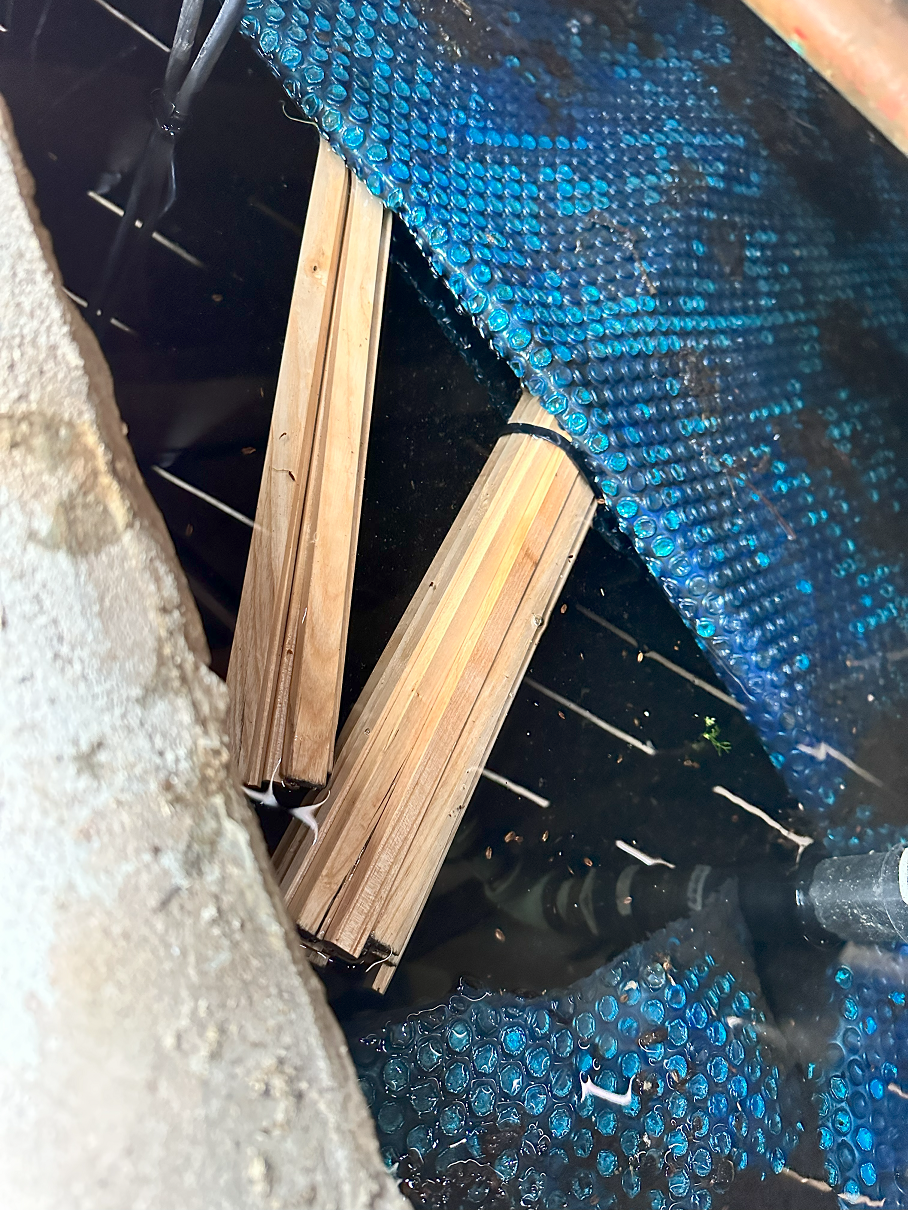
Ash ribs soaking in our cistern for a number of days.
|
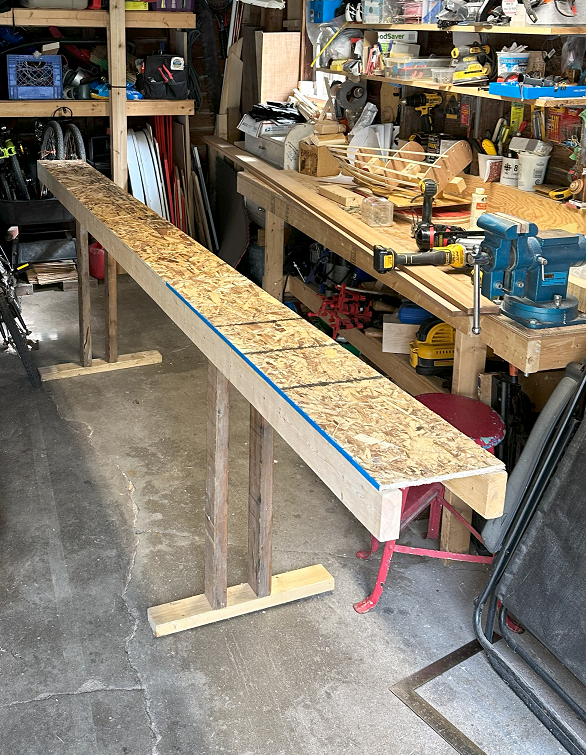
12' strongback ready to have the 5 stations attached.
|
Phase 4:
Build
Build Day 1
Sunday, September 3, 2023
My wife was off for a road trip with her daughter for a few days, so I decided to take advantage of this block of time. My plan was to work hard for a few days and see what progress was possible.
I had a workout in the morning and got started at noon. First up was weighing the cedar stringers which came in at 9.6oz each. I knew this would be my last chance to learn what they added to the weight of the boat.
I had cut out the 5 (premade) stations for the canoe and installed them on the strongback using a framing square to ensure proper orientation.
By 1:30pm I was gluing up two ¾” maple stems for the bow and stern. Each stem needed one extra piece to get the required shape--the Titebond III glue would need to dry.
I then planed down my scarfed gunwales and keel as they were a bit thick. After sanding I zip tied the gunwales to the stations. The outline of the boat was appearing!
Next I zip tied the cedar stringers to the stations. I always use releasable zip ties! Buy some and they will change your life.
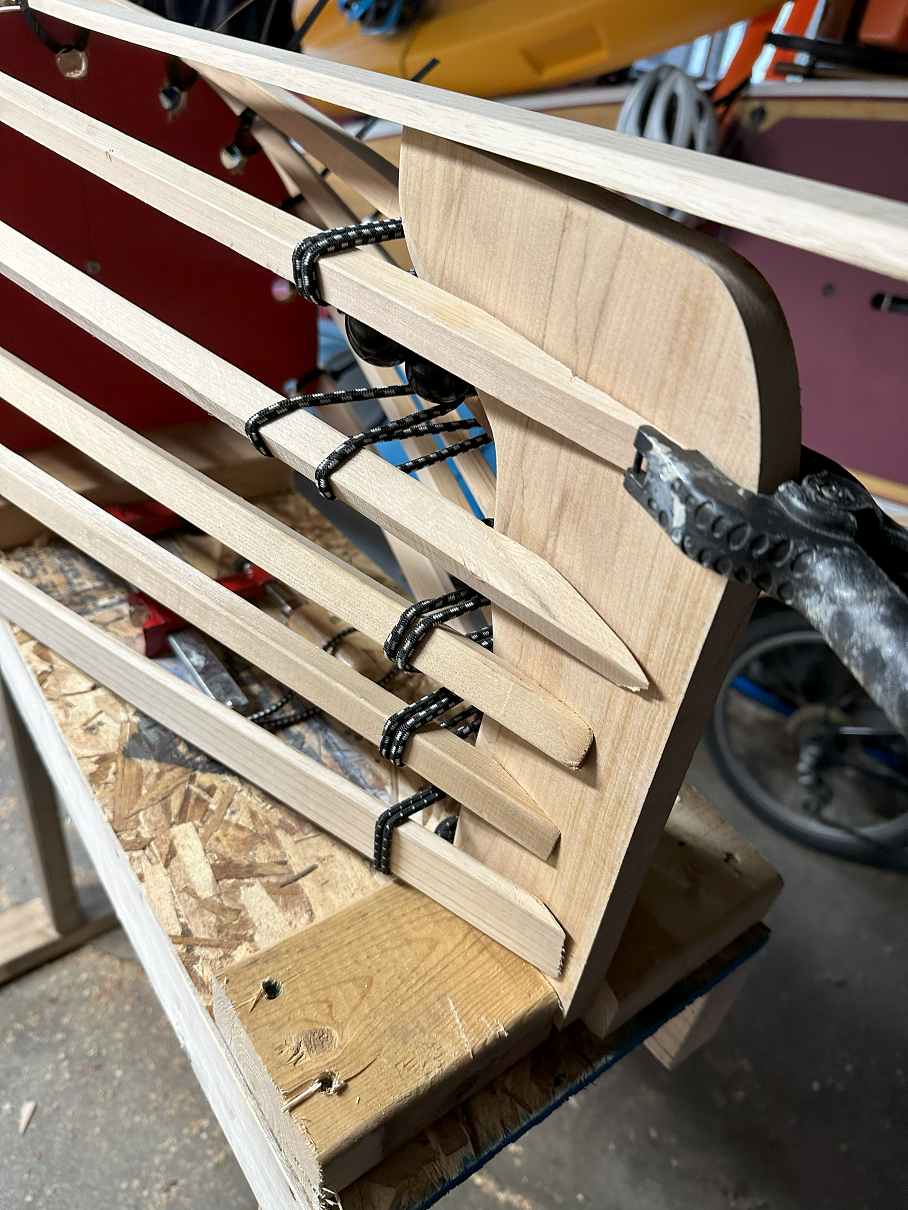
I then proceeded to jigsaw the stems to their final shape in preparation for installation. Sawing the end of the stringers to fit the stems was the most sketchy part of the entire project but I think I got enough contact area for the epoxy to hold. Holding them in place prior to epoxy application was tricky until I realised I could use ball bungees. Perfect. The look of the epoxy application was gnarly but I knew it would be largely hidden by the dacron later.
My notes say that at 7:16pm I finished gluing the stringers, keel and gunwales to the stems. Enough for Day 1!
Build
Build Day 1
Sunday, September 3, 2023
My wife was off for a road trip with her daughter for a few days, so I decided to take advantage of this block of time. My plan was to work hard for a few days and see what progress was possible.
I had a workout in the morning and got started at noon. First up was weighing the cedar stringers which came in at 9.6oz each. I knew this would be my last chance to learn what they added to the weight of the boat.
I had cut out the 5 (premade) stations for the canoe and installed them on the strongback using a framing square to ensure proper orientation.
By 1:30pm I was gluing up two ¾” maple stems for the bow and stern. Each stem needed one extra piece to get the required shape--the Titebond III glue would need to dry.
I then planed down my scarfed gunwales and keel as they were a bit thick. After sanding I zip tied the gunwales to the stations. The outline of the boat was appearing!
Next I zip tied the cedar stringers to the stations. I always use releasable zip ties! Buy some and they will change your life.
I then proceeded to jigsaw the stems to their final shape in preparation for installation. Sawing the end of the stringers to fit the stems was the most sketchy part of the entire project but I think I got enough contact area for the epoxy to hold. Holding them in place prior to epoxy application was tricky until I realised I could use ball bungees. Perfect. The look of the epoxy application was gnarly but I knew it would be largely hidden by the dacron later.
My notes say that at 7:16pm I finished gluing the stringers, keel and gunwales to the stems. Enough for Day 1!
|
|
Gnarly!!
|
Build Day 2
Monday, Sepbember 4, 2023
Steam day!
At 9am I got the steamer set up. It’s just a pine box with some dowels sticking through to keep the wood airborne in the steam.
I also decided to open a little notebook on my bench and make occasional notes on progress. That’s why you are about to see a bunch of precise timings.
As the box began heating up I worked on the spacing for the ribs. I wanted a bit more structure strength near the seating position and ended up with these spacings for the plan. Numbers show inches between ribs from Bow to Stern.
9,9,9,8,7,6,6,6,6,7,8,9,9.
Once I marked the positions I realised that one of the ribs was right on a building station. So I had to move it by an inch.
The steam box was on a slight angel to allow water to drain out via one hole. I had also drilled very small holes in three positions on the top of the box so that I could track the temperature. By 9:35am the temperature was over 200 degrees and it was time for steam bending drama. I started loading in the ash into the steamer--at 10 minute intervals. The wood had been soaking in my cistern for about 5 days.
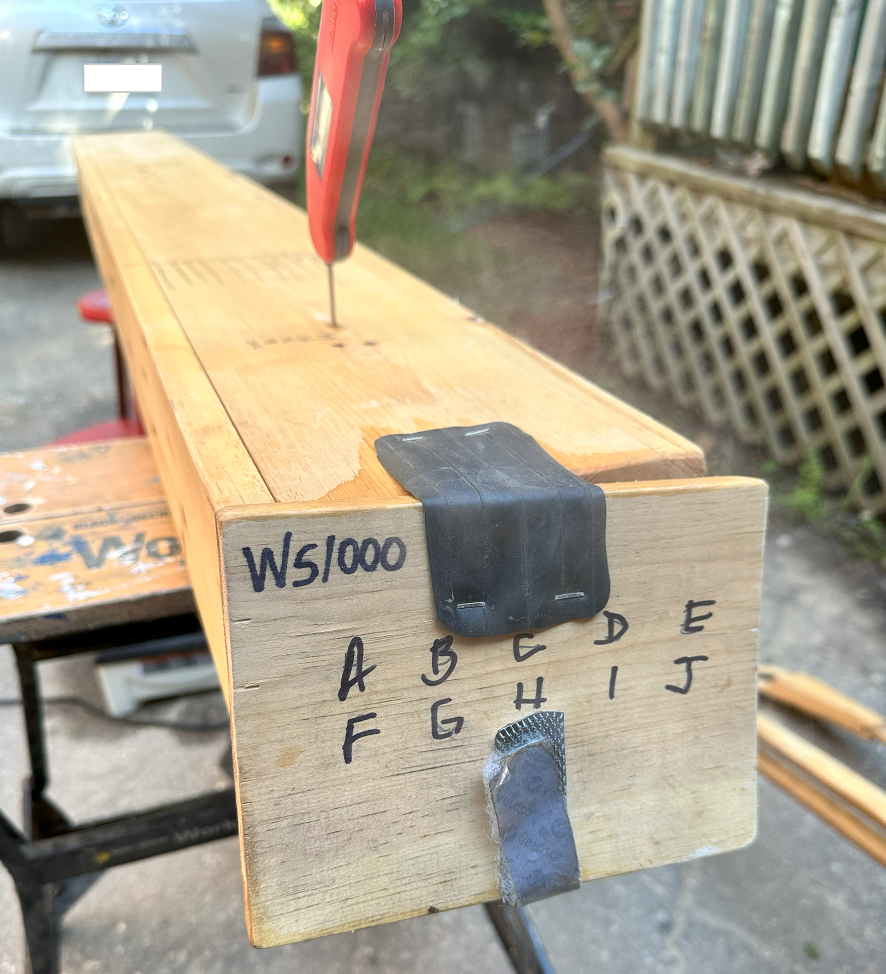
The letters help identify where each piece was loaded in the steam box which had two levels separated by dowels.
|
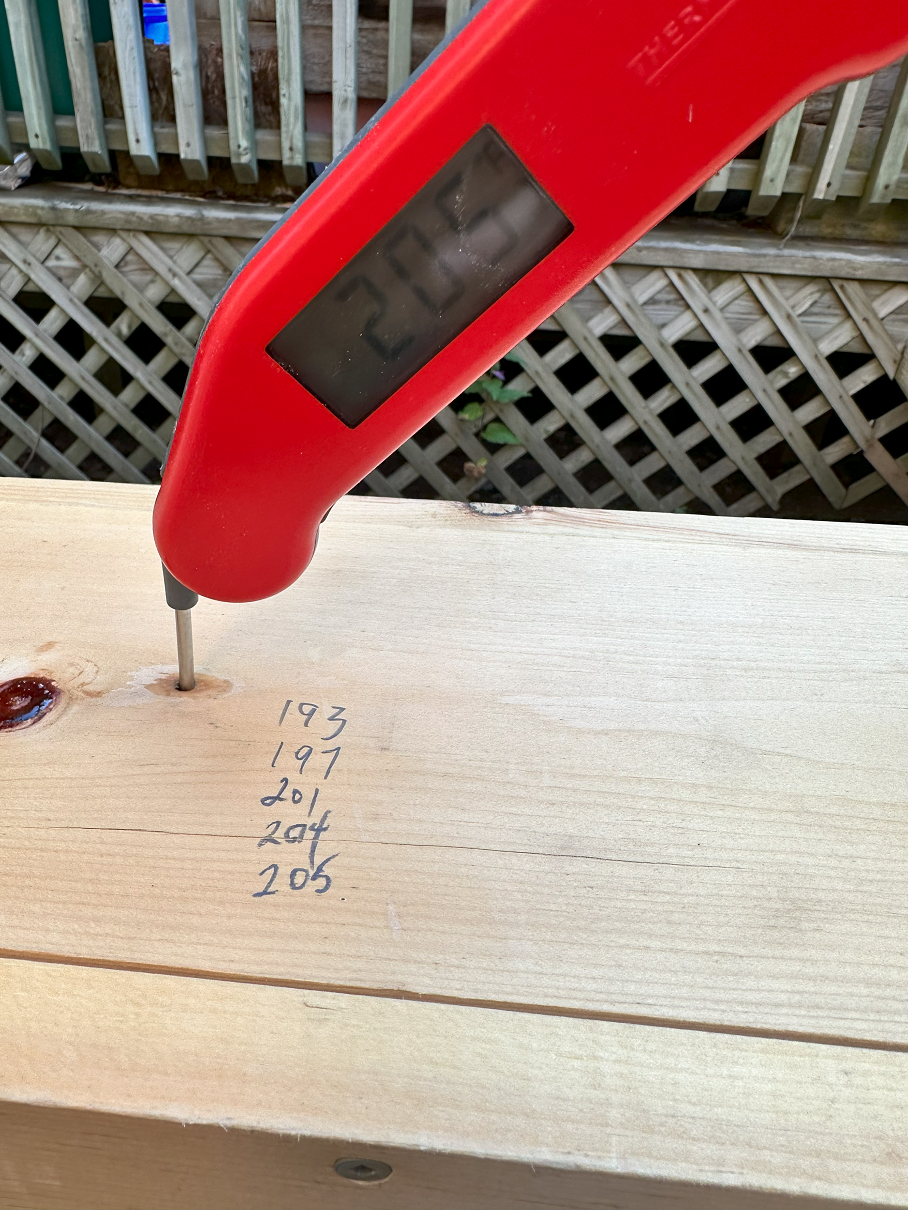
I noted temperature progress during the heating cycle.
|
Keeping track of when each piece went in helped to ensure each piece steamed for about 20 minutes. But ultimately, it was feel that determined if the piece was ready. If too stiff, back in it went. And all these pencil marks can be sanded off for the next project.
|
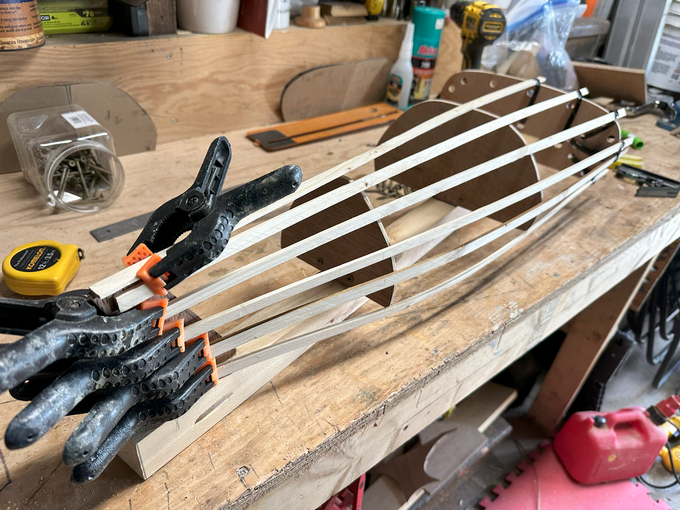
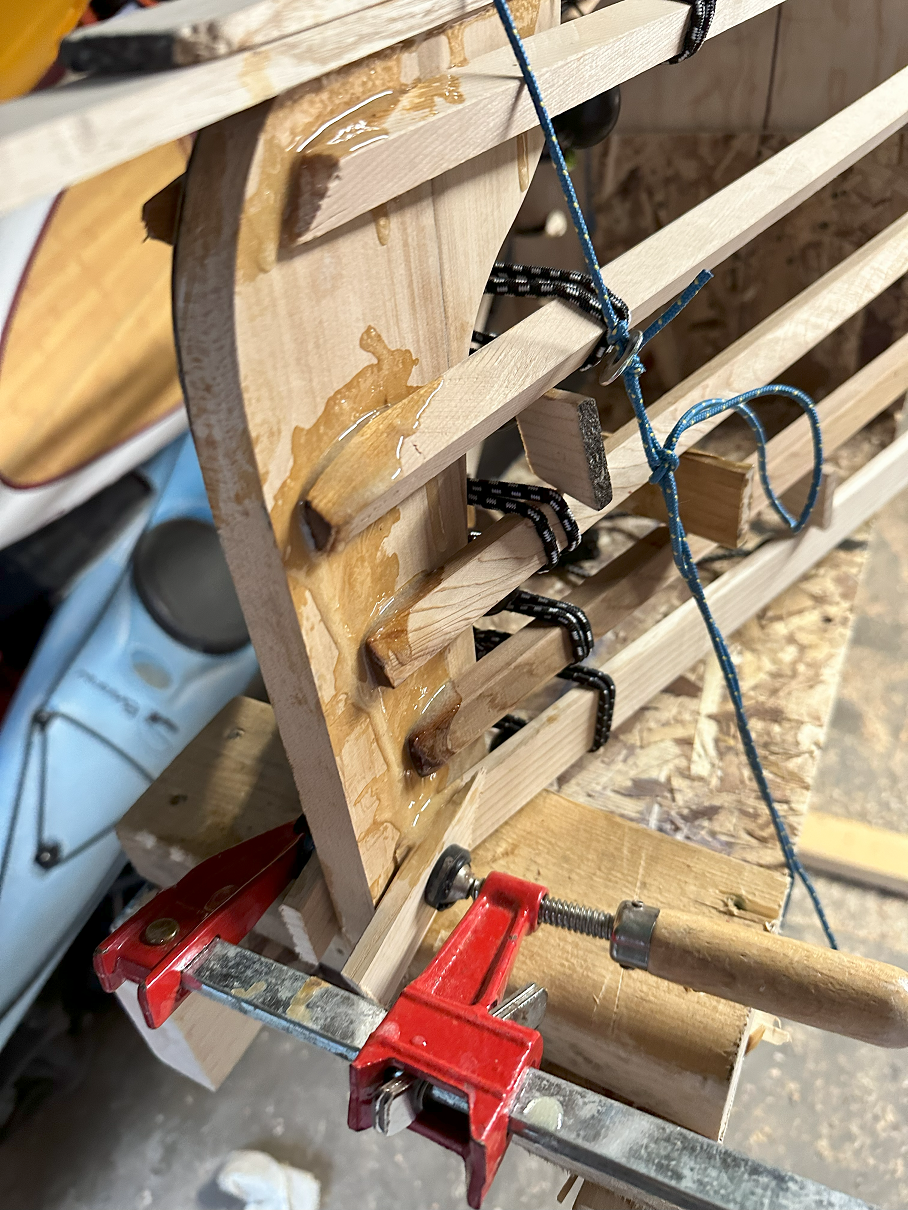
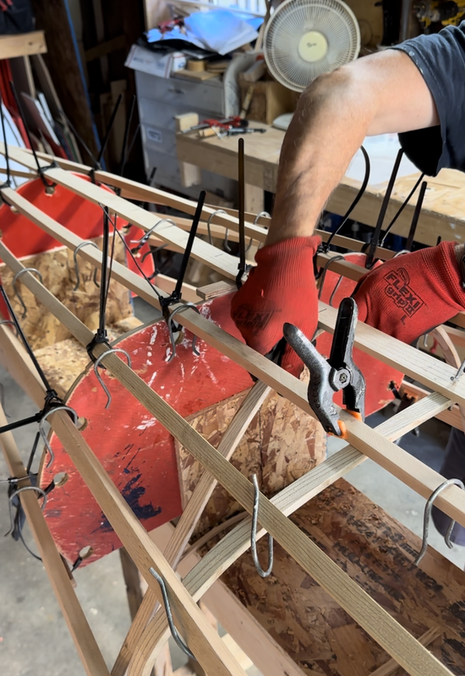 I used traditional clamps but also Clampits which are basically heavy wire U shaped clamps. They work really well! They can be sourced from the fine people (Larry!) at GAboats.com
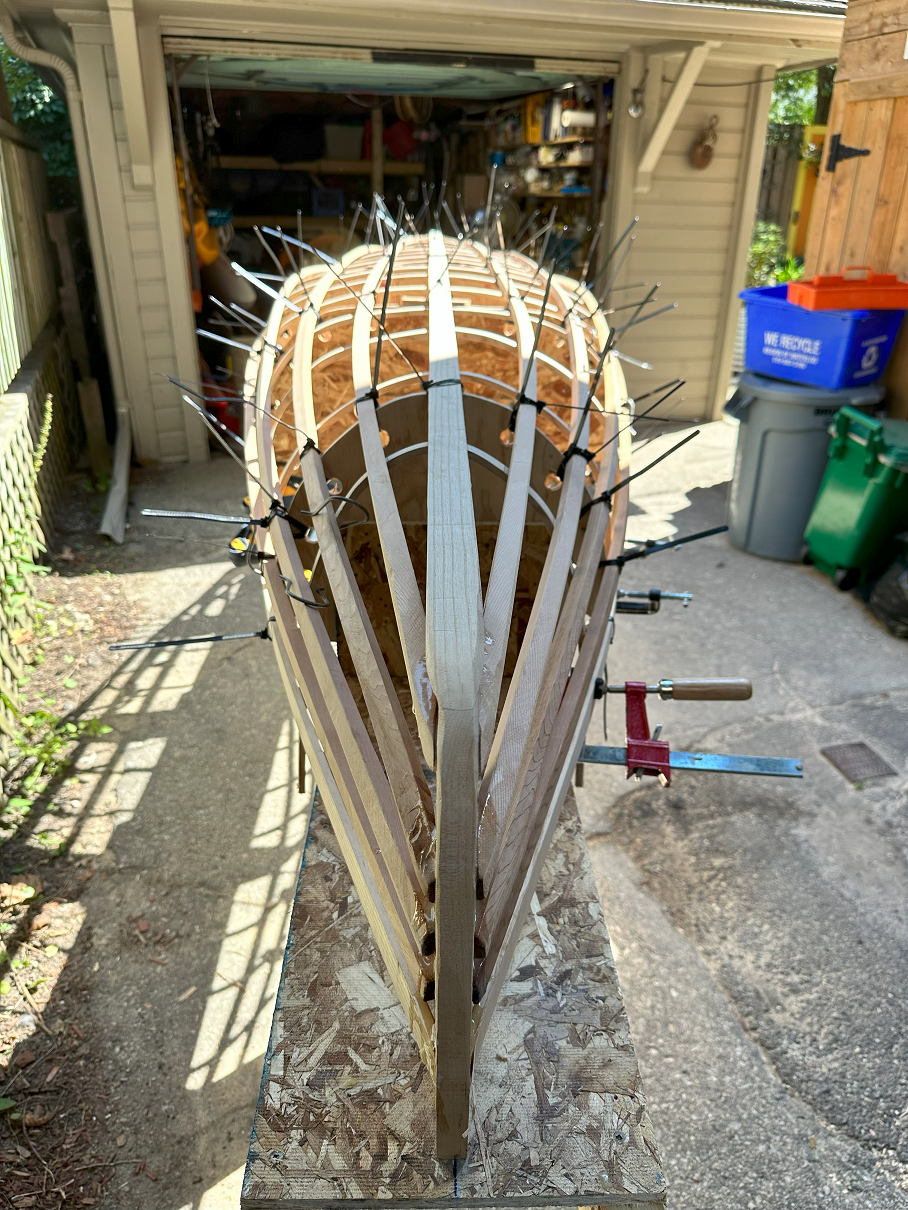
I loaded one rib into the steamer evey 10 minutes. They each individually steamed for 20 minutes. This approach allowed a reasonable amount of time to then get each rib bent and clamped into the required shape within the boat.
Each rib would require clamps and clampits to hold them in position. Shortage of clamps would become an issue requiring careful planning. I included little shims at the gunwales to over-bend the ribs a little. This action recognized that the ribs would want to spring back a little once the clamps were removed.
At one point the hose providing the steam fell out of the bottom of the steam box which threw off the timing a little.
At 10:30am I proceeded to bend a larger central rib into position. It then broke near the end where the most serious bend for the tumblehome was. I quickly pulled it out and used it near the front of the boat where the remaining shorter rib would still fit. Whew! Lesson--always attempt large rib installations first. If you break a rib near the end, you can still attempt to bend one of the shorter ribs near an end of the boat.
More excitement at 10:50am as I broke a second rib (the last to break) and the kettle ran out of water. Thank goodness I had straight grained ash with no knots which minimized breakage.
At 12:20pm I was done! I moved it into the sun with help from a family member to dry. It was such a hot day!
I grabbed some lunch and cleaned up a bit and was back at it by 2pm. I rough cut the ribs off where they extended past the gunwales but did leave a few inches as the epoxy had not been applied yet making the final exact rib location a question.
I then worked on the stems a little and pulled off most of the clamps.
By 2:45pm I was mixing epoxy. Perhaps I should have let the wood dry out overnight but in the heat of the day I felt it safe to proceed. Or was excitement driving me forward?
I epoxied 6 or 8 ribs and then ended up going to happy hour at a friend’s home. Friend Bob ended up loaning me a bunch of clamps which I was then able to use at 5:30pm to finish the installation of the remaining ribs. I even ended up using a few releaseable zip ties to get the last ribs holding. Did I mention that releaseable zip ties would change your life?
The boat would dry overnight.
Build Day 3
Tuesday, September 5, 2023
I got up early and did my exercises and then a short 3km run. By 9am I was in the barn (it’s what I call my garage) and by 9:17am had all of the clamps off the boat.
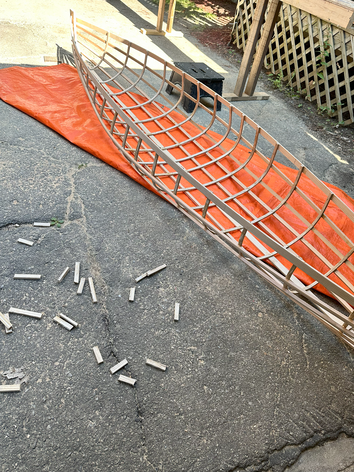
It was time to epoxy the ribs into their final locations. I applied the two part epoxy between each rib and it's stringer/gunwale/keel and then re-clamped. After it dried, I removed all the clamps and sanded the stringers to ‘fair’ the lines. This would ensure the dacron would not have to bend around sharp curves. Fairing the boat involved holding a super thin piece of wood against the outside of the hull. The thin wood would easily follow the curve of the boat and show me how the dacron would lay on the boat. If a rib was angled such that only a point would be in contact with the dacron I then planed or sanded it such that more contact would be created.
By 10:34am I was releasing the 5 stations. I weighed myself and then grabbed the ‘boat!’ and weighed myself again.
The boat weighed 16lbs!
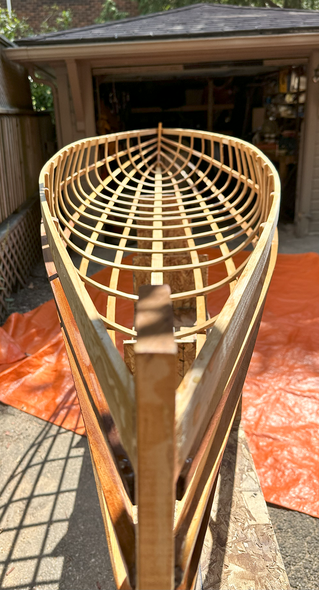
By 11:02am I was doing the final careful trimming of the ribs at the gunwales.
Post trim it weighed 14.9lbs!
The final rib positions came out at: 9,9,8,7,7,6,5,6,7,8,9,9,9.
By 12:51pm I had applied a ½ pint or 125ml of tung oil to the wood. I did not apply the tung oil to the outside of the gunwales and keel as this is where the HeatNBond glue tape would later be applied. Tung oil would interfere with tape adhesion.
Time for lunch.
Tuesday, September 5, 2023
I got up early and did my exercises and then a short 3km run. By 9am I was in the barn (it’s what I call my garage) and by 9:17am had all of the clamps off the boat.
It was time to epoxy the ribs into their final locations. I applied the two part epoxy between each rib and it's stringer/gunwale/keel and then re-clamped. After it dried, I removed all the clamps and sanded the stringers to ‘fair’ the lines. This would ensure the dacron would not have to bend around sharp curves. Fairing the boat involved holding a super thin piece of wood against the outside of the hull. The thin wood would easily follow the curve of the boat and show me how the dacron would lay on the boat. If a rib was angled such that only a point would be in contact with the dacron I then planed or sanded it such that more contact would be created.
By 10:34am I was releasing the 5 stations. I weighed myself and then grabbed the ‘boat!’ and weighed myself again.
The boat weighed 16lbs!
By 11:02am I was doing the final careful trimming of the ribs at the gunwales.
Post trim it weighed 14.9lbs!
The final rib positions came out at: 9,9,8,7,7,6,5,6,7,8,9,9,9.
By 12:51pm I had applied a ½ pint or 125ml of tung oil to the wood. I did not apply the tung oil to the outside of the gunwales and keel as this is where the HeatNBond glue tape would later be applied. Tung oil would interfere with tape adhesion.
Time for lunch.
Final trim of ribs took off a bit of weight.
|
Tung Oil drying in the sun.
|
At 1:23pm I was sanding the gunwales and keel in preparation for HeatnBond tape that would hold the dacron in place. I reinstalled two of the stations to hold the boat in place and then applied the tape.
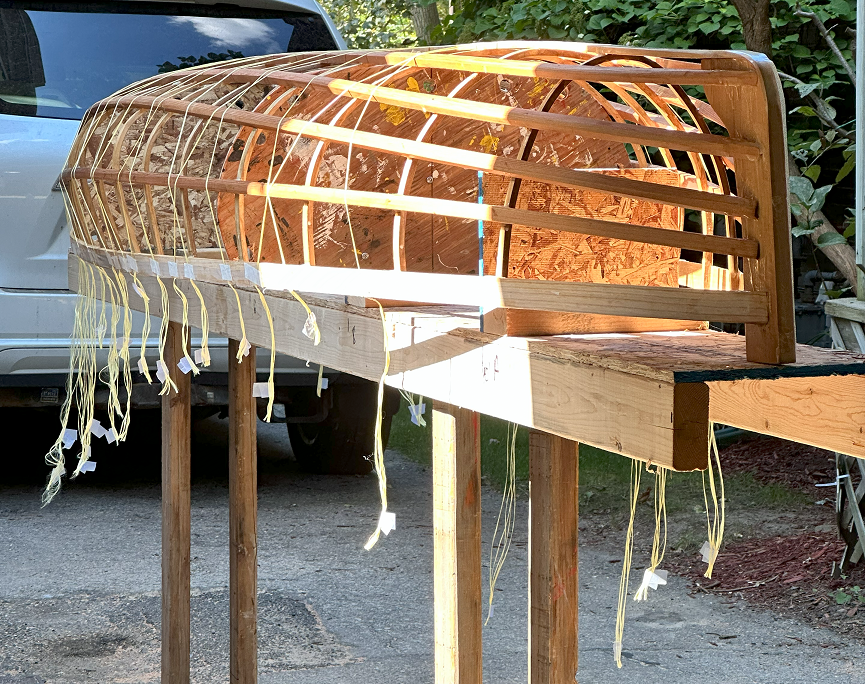
By 3:45pm I had installed 18 runs of Kevlar rovings to give the boat strength. I’m not convinced this was necessary but decided to be cautious. You can see by the pictures that it lies on a 45 degree angle over the boat. This approximate angle is how it then provides additional rigidity to the wooden frame of the boat.
By 3:45pm I was ‘sizing’ the Kevlar which is a critical step. This process involves soaking the rovings with spar varnish using a rag or sponge. This allows the rovings to stretch. Once stretched they need to be retightened by heating the tape while pulling the yellow rovings down below the gunwales. Once stretched, the heat is removed and thumb pressure on the tape glued to the gunwale ensures a bond while it cools. Care not to get burned is important but not usually an issue. This process ended at 4:14pm.
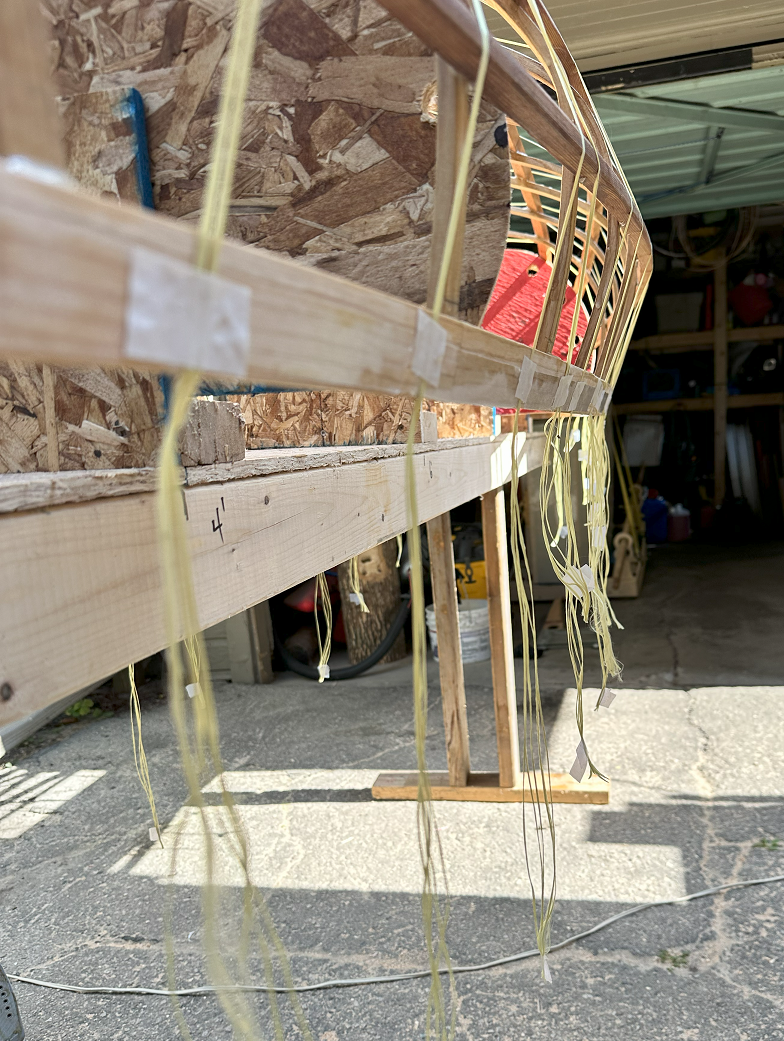
Kevlar rovings are attached to the gunwales with HeatnBond. An amazing tape product that is a super strong glue. Once heated with an iron, it then cools bonding the kevlar roving to the ash gunwale. The protective cover on the tape is then pulled off.
|
Peeling off the protective covering.
|
|
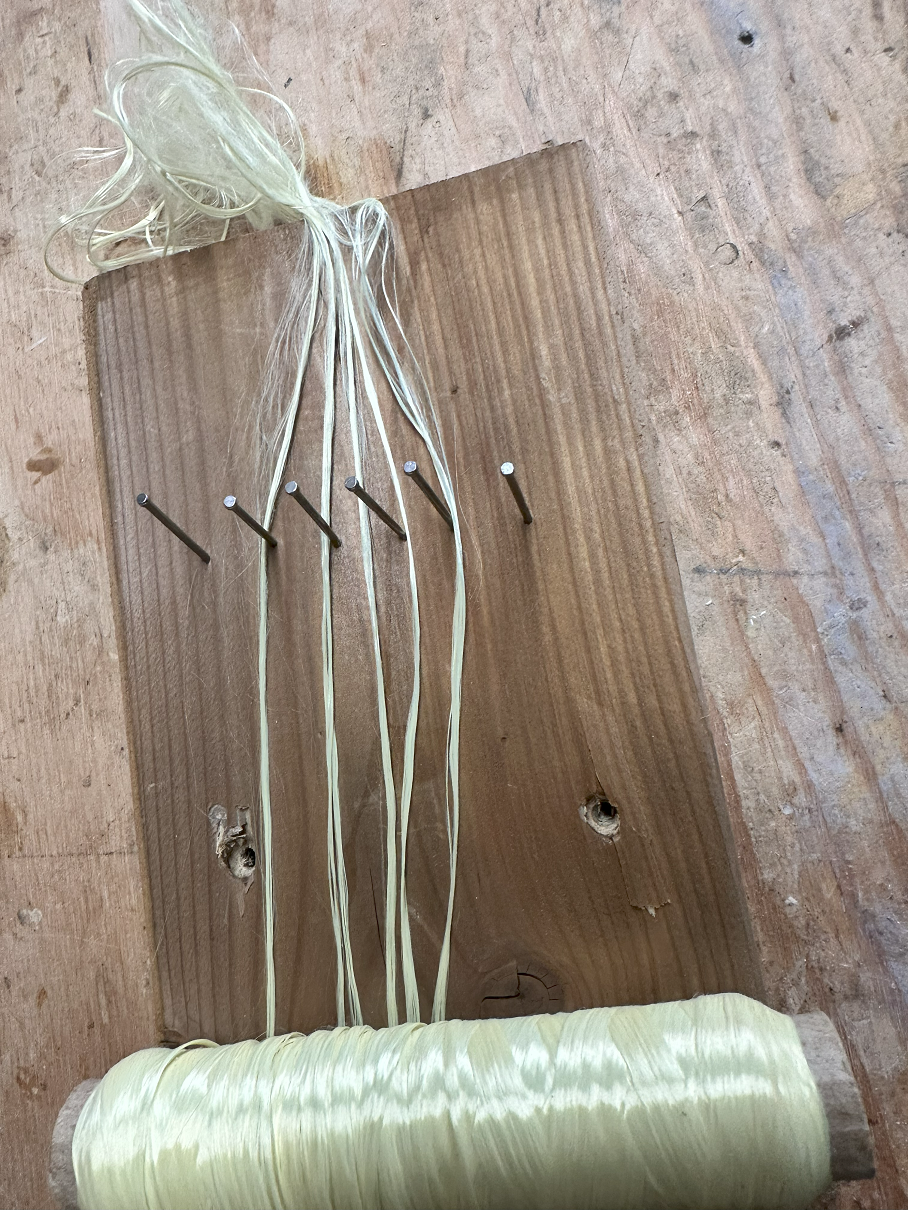
I made this simple rovings comb to help keep the rovings flat. It's an idea I got from Platt Monfort's 70 minute instructional video that can be bought through gaboats.com
|
|
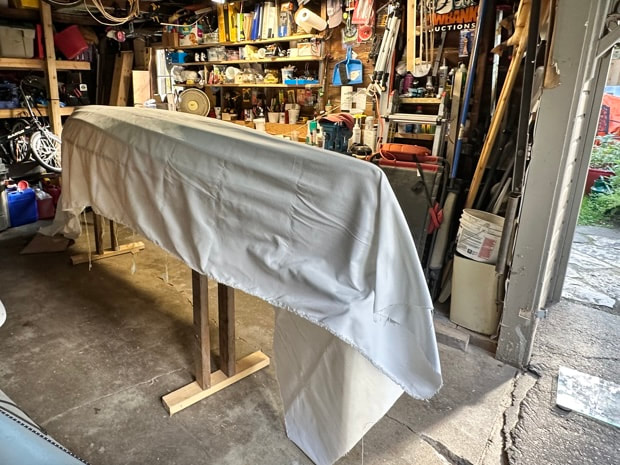
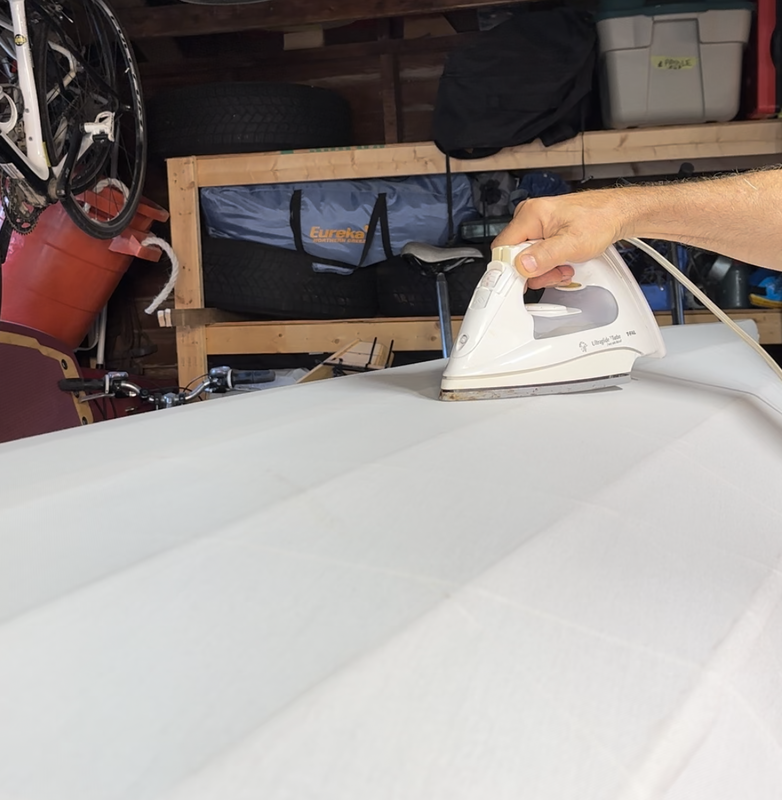
I put the boat back into the barn and threw on the dacron. I ate a quick dinner at 5pm and then was installing the dacron and ironing the gunwales by 5:11pm. I then ran inside to watch the key Platt Montford video and another key video by Larry Lalonde of GA Boats on how to finish the dacron around the stems. By 7:50pm had ironed and rough trimmed the two stems—a tricky process involving more HeatnBond tape. I gave the whole boat a preliminary iron and then was done for the night.
Careful trimming with a razor knife was needed on the edge.
|
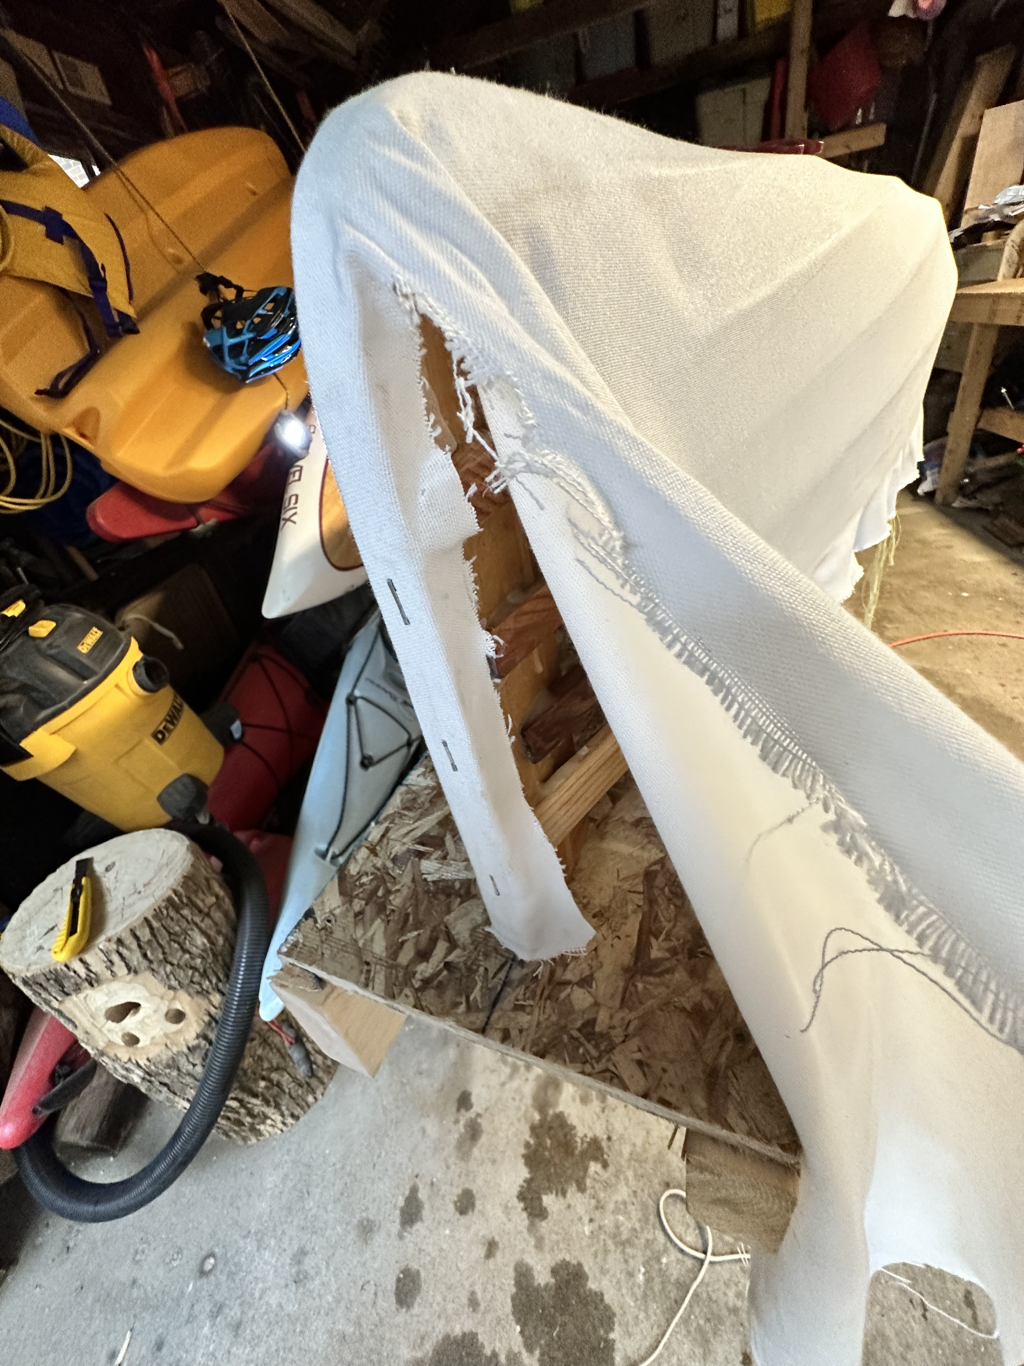
I was trepidatious tackling the dacron at the stems but it went well! I pulled the one side tight and stapled it over some HeatNbond tape and then ironed it to make it stick. Then I applied more HeatNbond tape over the staples, pulled the second side on top and ironed it all. A careful trim of the remaining dacron cleaned it up.
|
|
Build Day 4
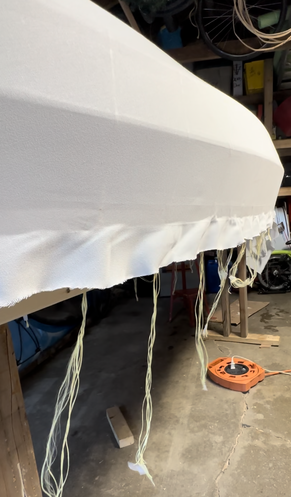
Wednesday, September 6, 2023. I started the day running down to Dollarama to get a roller handle for $1.98. They had the perfect choice. This would be key to rolling on the two part urethane sealer. I then started ironing the dacron to tighten it up. It should shrink by about 12% but I was having trouble getting the boat tight enough. The trick was to slow way down and by 10am I was done! I cut off the extra material next to the gunwales as I carefully cut through the kevlar rovings as well. |
Sloooow!
But don't burn it.
A tricky balance.
|
|
At 10:12am I began mixing two part urethane. Everything was organized perfectly as timing is key. The first coat went on at 10:22am. I didn't have time for pictures as it was a delicate operation. lol
It was also the hottest day of the year hovering around 39 degrees Celsius. Maybe too hot for such a job…. The dacron was really soaking up the urethane and I had to mix multiple batches to finish the first coat. At one point I mixed a batch that was too big. It started to 'cook' which shortened its application life. Keep the batches small! By 11:40am I had finished the entire boat plus ¼ of coat #2. By 12:16pm all of coat 2 was done and it was taking way less product. The third coat started at 12:30pm and was done at 12:50pm. I then went in for breakfast followed by the 4th light coat by 1:30pm. The boat was done! Now to let it dry on the hottest, most humid day of the year. In the end, likely because of the excessive heat, the surface of the skin was not as smooth as my UB1000. The other thought is that I maybe should have allowed some more drying time between coats. I will research this further prior to future projects. |
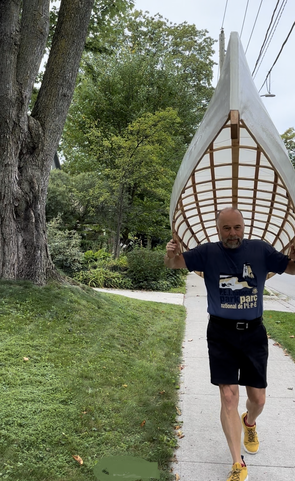
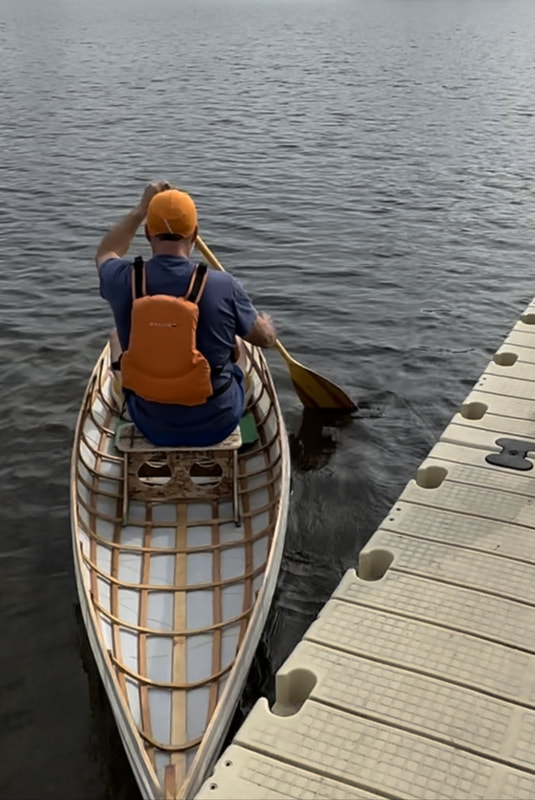
My first portage!
|
|
|
|
Post Build activities:
|
Thursday, September 7, 2023.
The boat was still tacky so I took it off the strongback to dry more. I then took apart the strongback and generally cleaned up the barn. I also had a short trip to a contact who had more green ash wood for me. I think I might be cornering the market! And the boat weighed 20.8lbs! I decided to round down to 20lbs. By 4pm I had glued up a seat for the canoe and built a storage rack in the back of the barn. Friday, September 8, 2023. I drilled holes into the stems for easy carrying and realised the ribs may have lost a bit of water by drying more. The new weight was 20.6lbs! Final dimensions: Length: 11’ 11” Widest point: 31" Height: 13.25” Sheer: almost zero Rocker: very little Waterline: 27 1/4" Draft: 2” |
|
Phase 5:
Testing and adjusting
Testing and adjusting
Bicycle hitch
|
Building the trailer hitch:
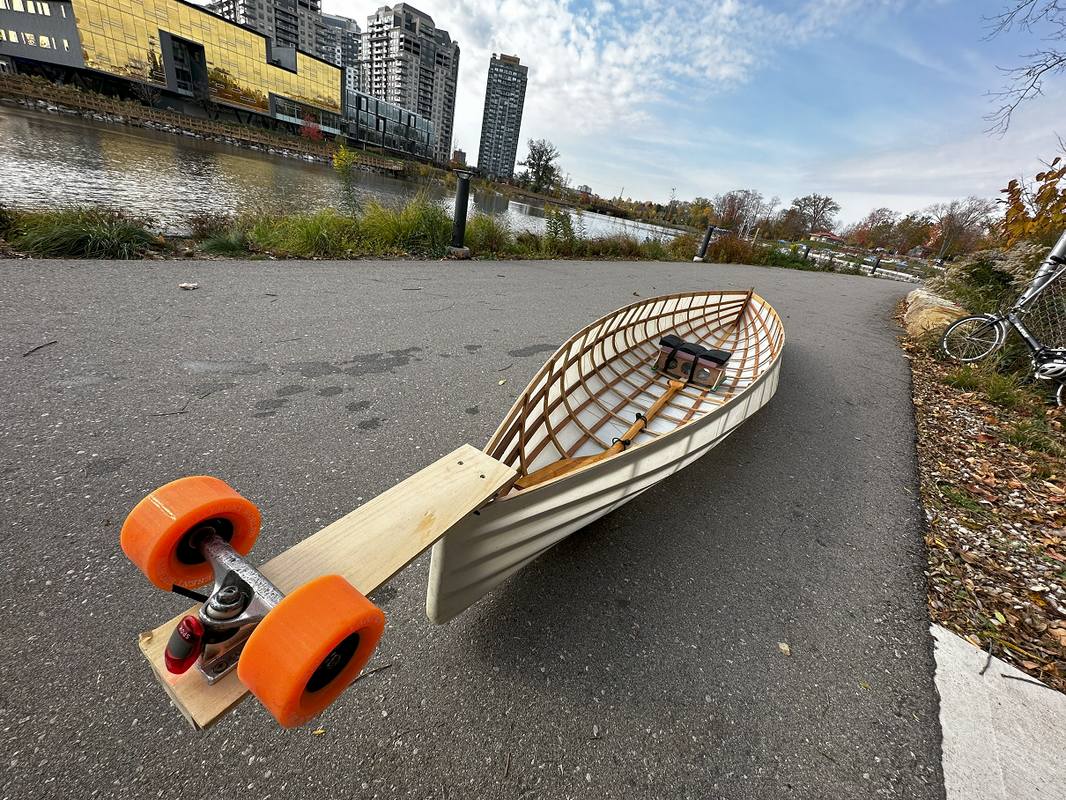
The idea was to have skateboard wheels support the back end of the canoe and a swivel hitch support the front at the bike. Here are some of the ideas I was playing with. 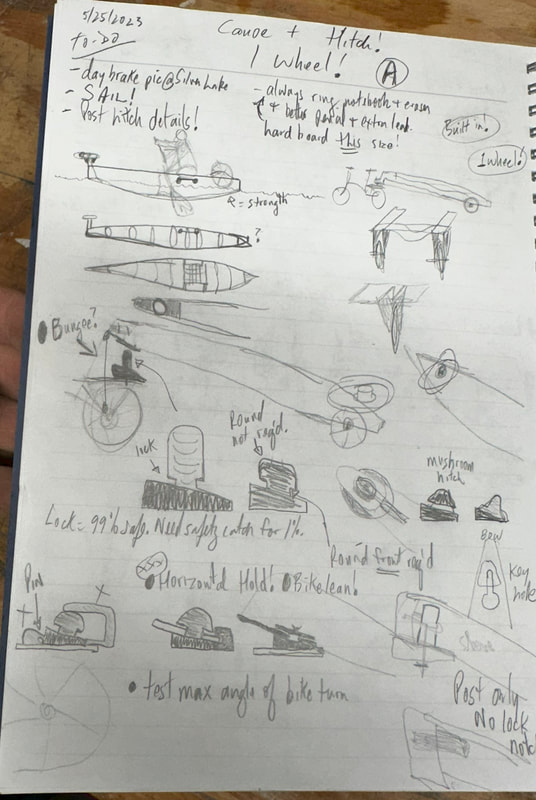
A bit of the planning that went into the hitch design.
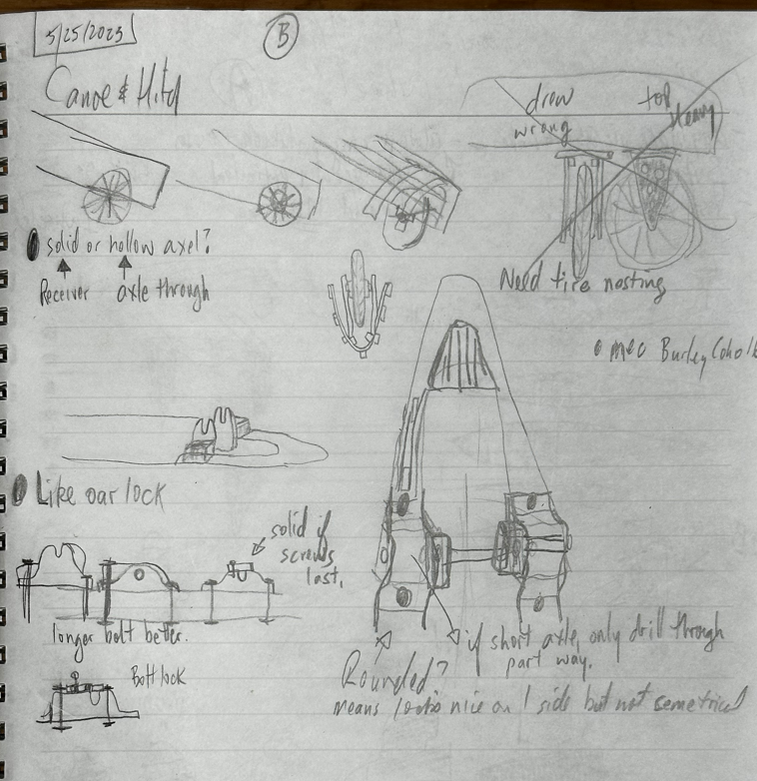
Some earlier designs back in May.
To start testing I needed some skateboard wheels and oddly enough found some in Riverview New Brunswick while on vacation! I dropped in on Atlantic Canada's only indoor skate park and met Ross and Aaron of Surface Skate Shop who promply dug into their bin of old parts and made me a truck! These two gentlemen are awesome and so welcoming to the people who use their facility.
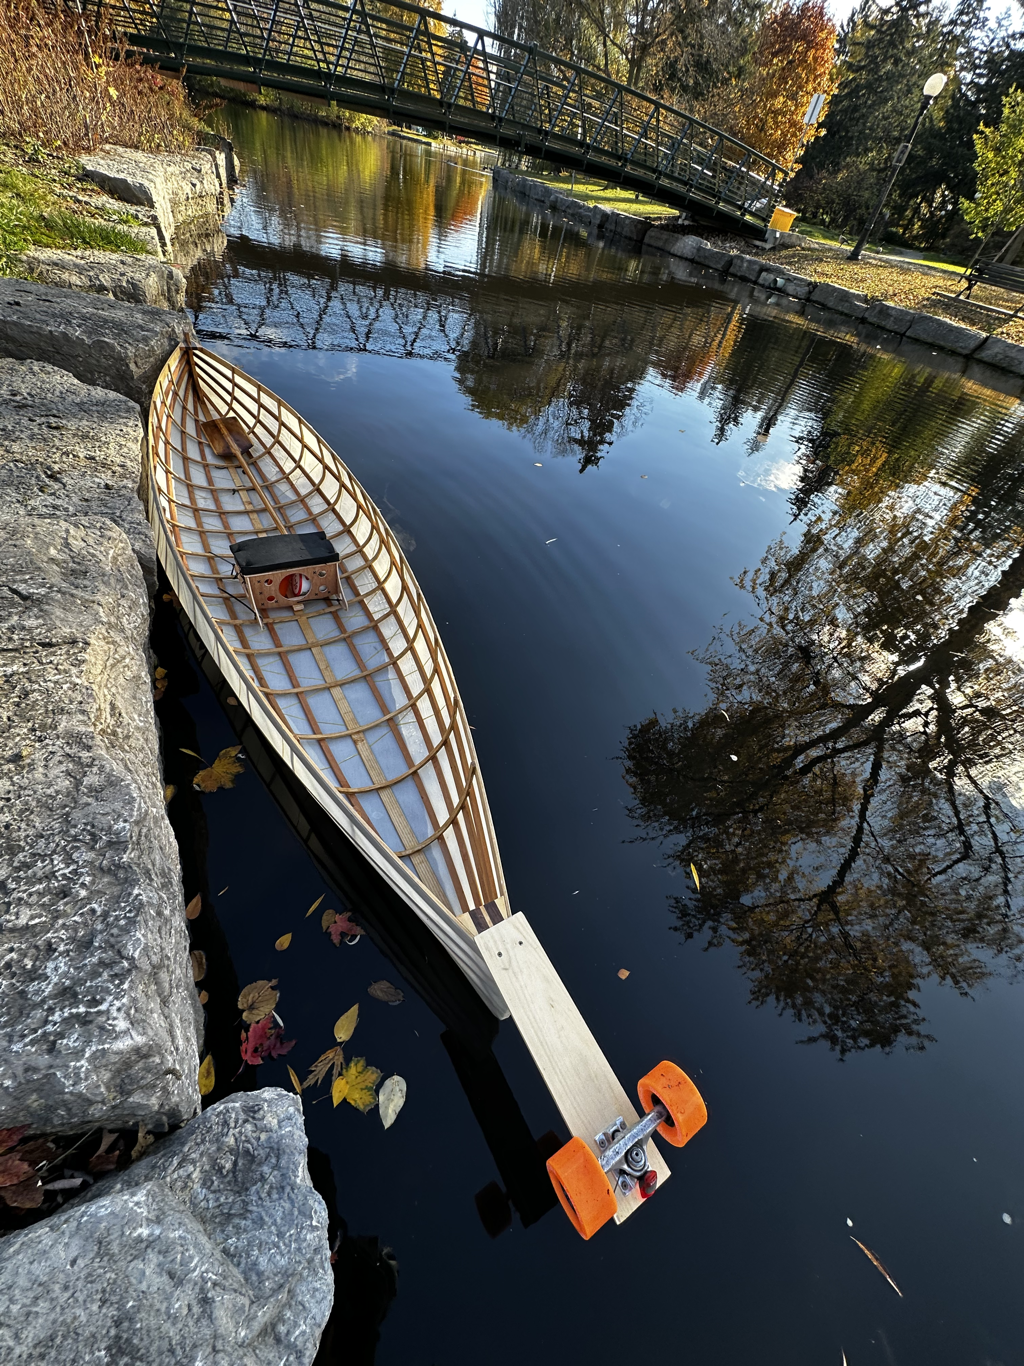
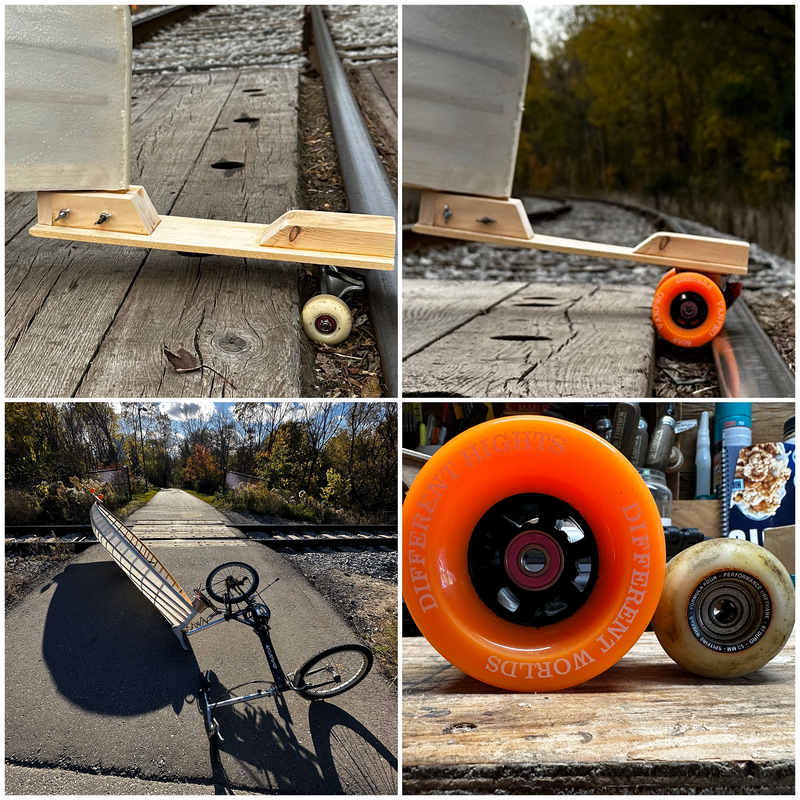
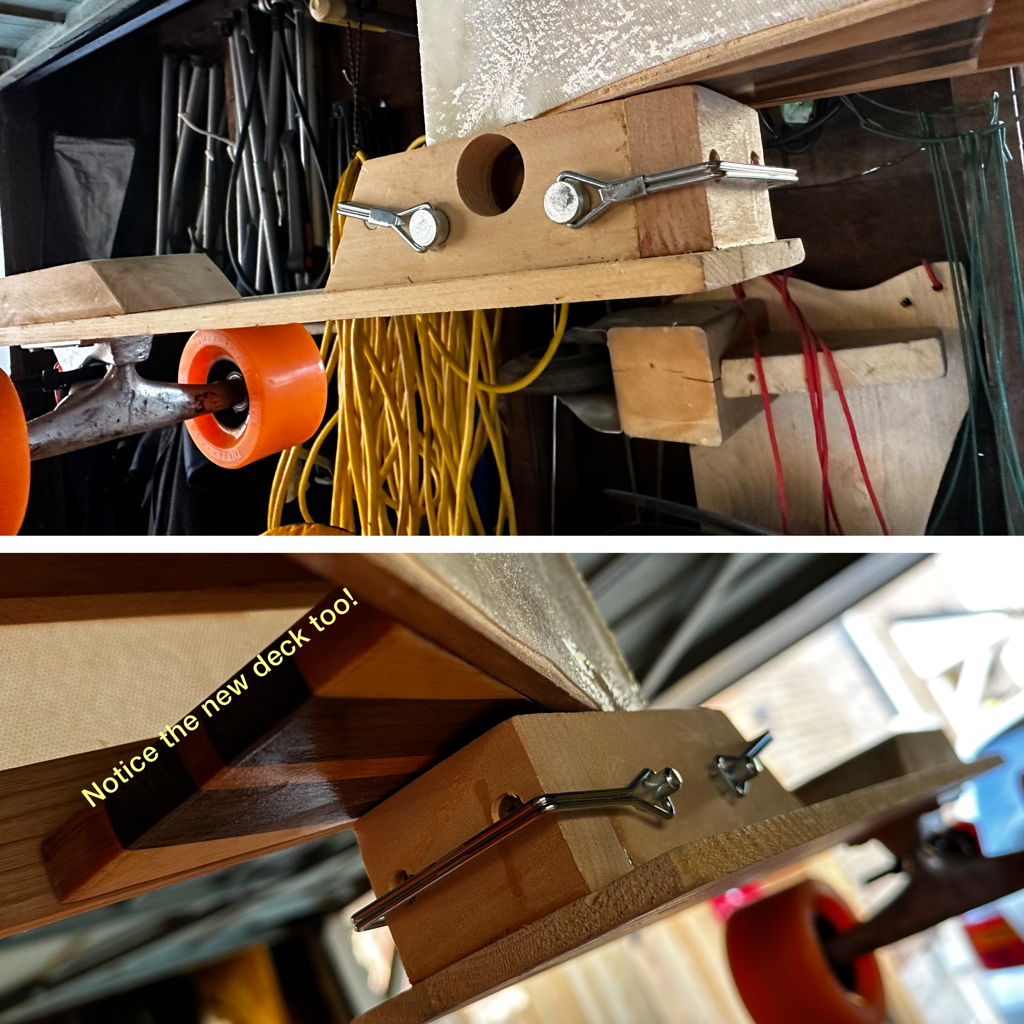
When i got home I built the rig. The back end housing received the extended stem of the canoe and two pins held with wing nuts secured it. The board between the canoe stem and the skateboard wheels had a bit of length to hopefully add some suspension to the proceedings. The swivel housing that rides on my bicycle carrier was a bit trickier as I had to angle the receiver to allow the canoe to slide in. As the canoe does not ride horizontally, this angle was key. I lined the canoe up on the bike carrier and marked the angle I needed. Check out the picture of my numerous cuts it took to get it just right. I tested it out and (as expected) the wheels fell into the railway tracks. So I lifted them out which promptly allowed the whole rig to fall over, twisting the 4" swivel. I rebuilt the rig and started investigating for larger wheels. I found 3.5" longboard wheels online and had them shipped. |
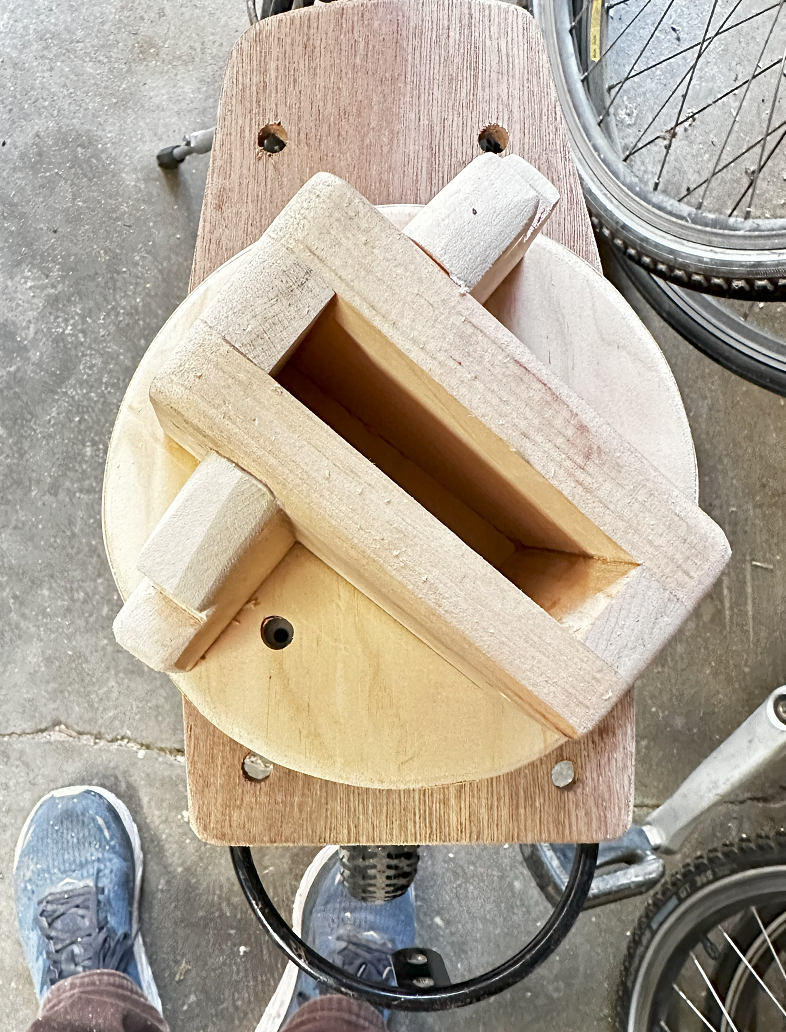
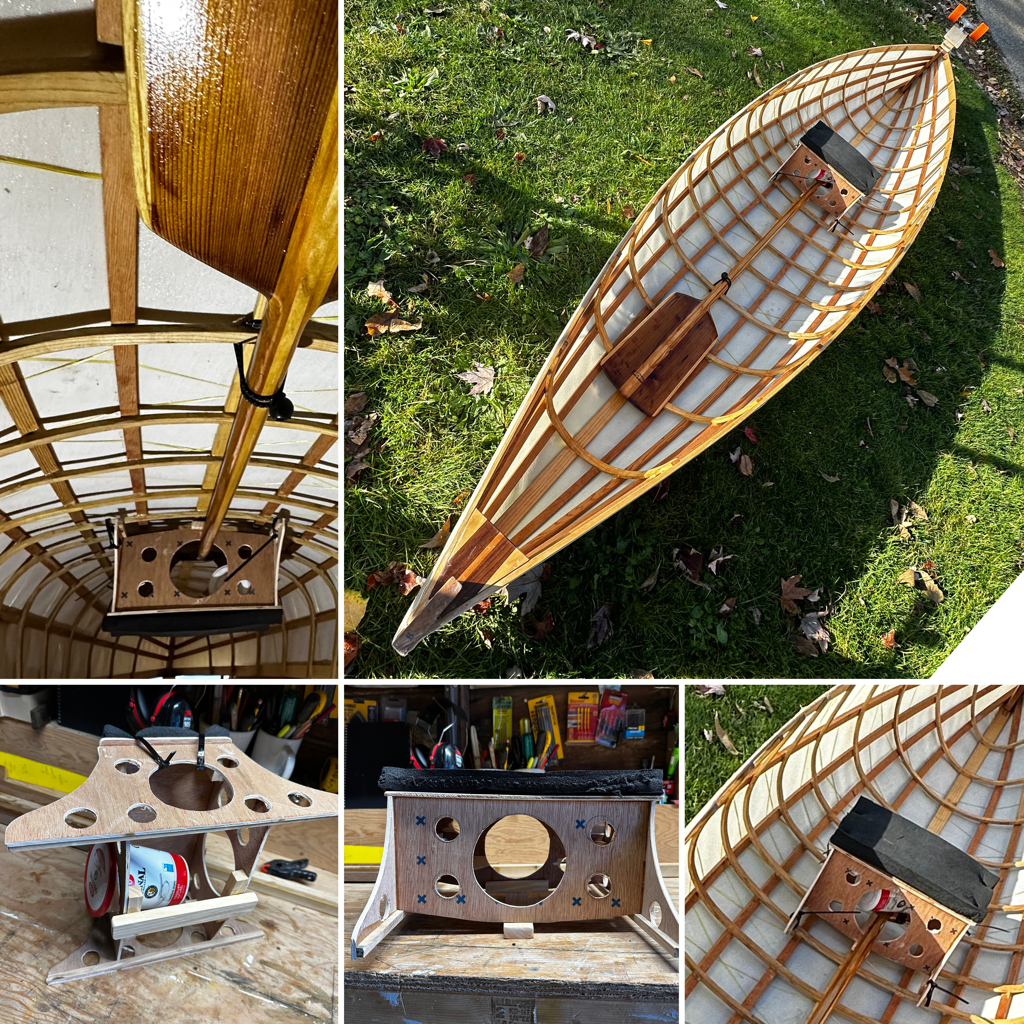
Overhead view of my canoe stem receiver that is attached to the bicycle carrier. The 3/4" maple stem of the canoe simply slides into this slot. The housing is built on a 4" bar stool swivel. You can see the holes in the plywood base that holds the swivel where soon, releaseable zip ties will afix it to the carrier. Did I mention how releasable zip ties will change your life?!
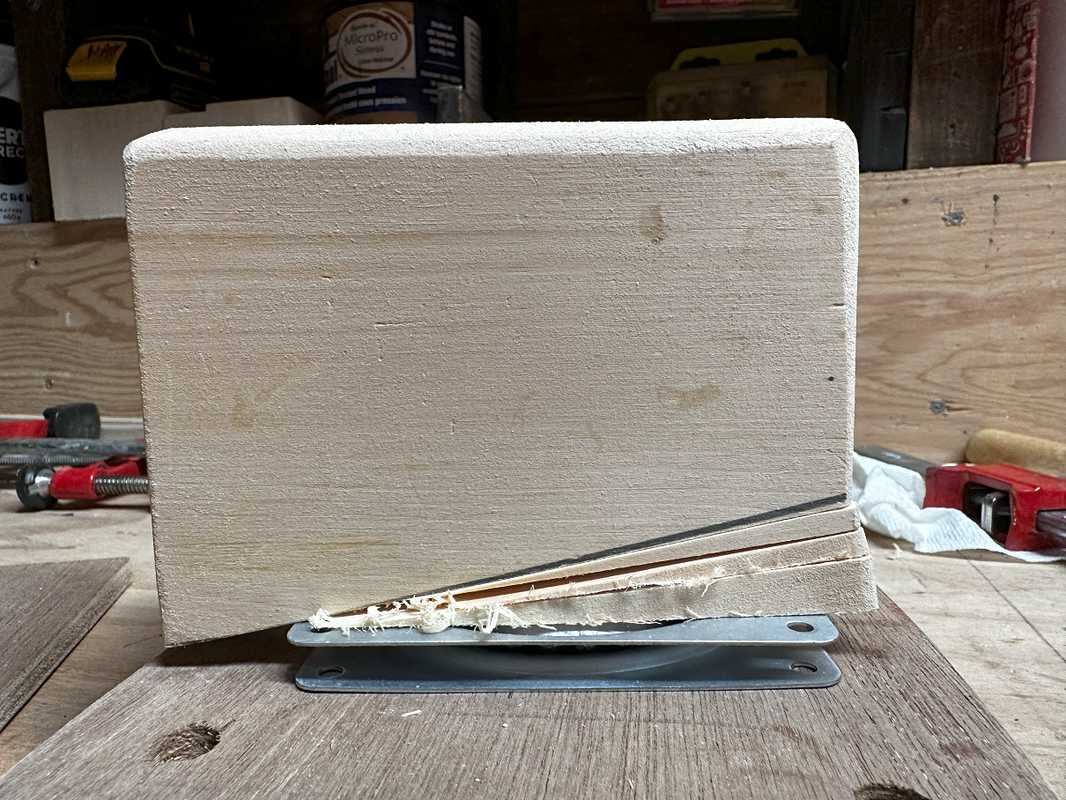
I trimmed the housing until the angle was just right to allow the canoe stem to slide into it.
In this picture I showed the three pieces that I cut off. They would of course be removed so that the housing could be then screwed to it's base on the swivel.
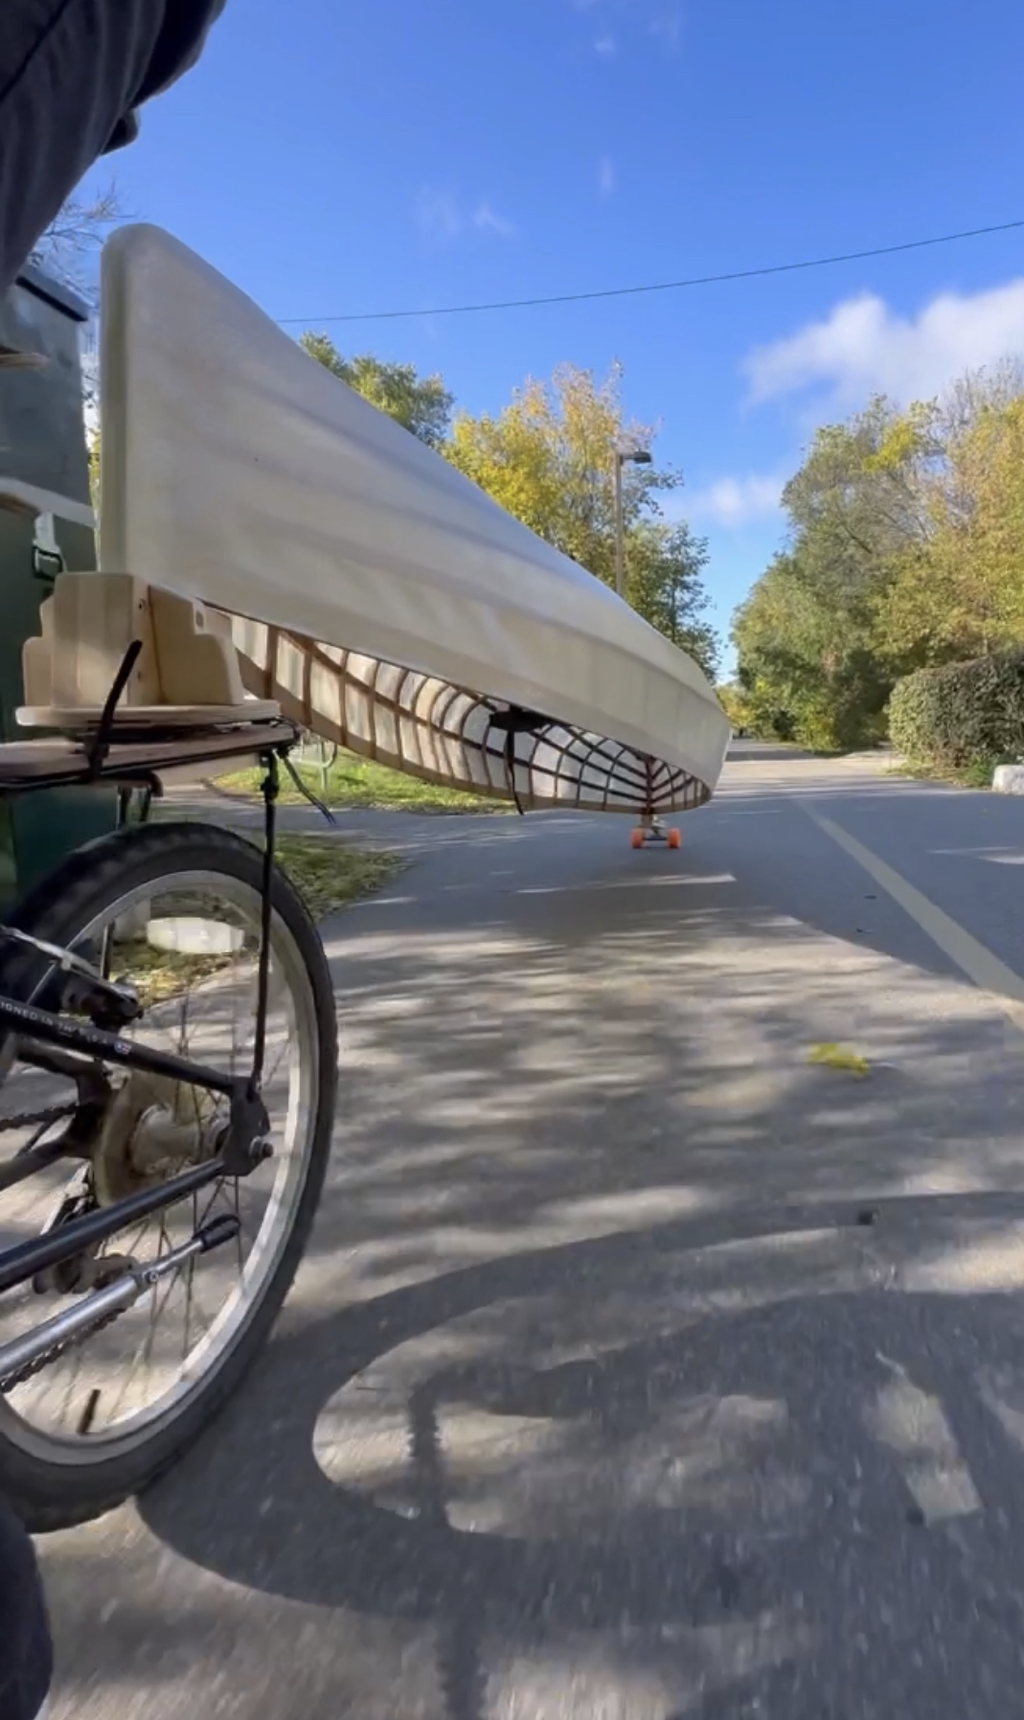
Riding down the trail!
|
Paddle
|
Tuesday, October 17, 2023.
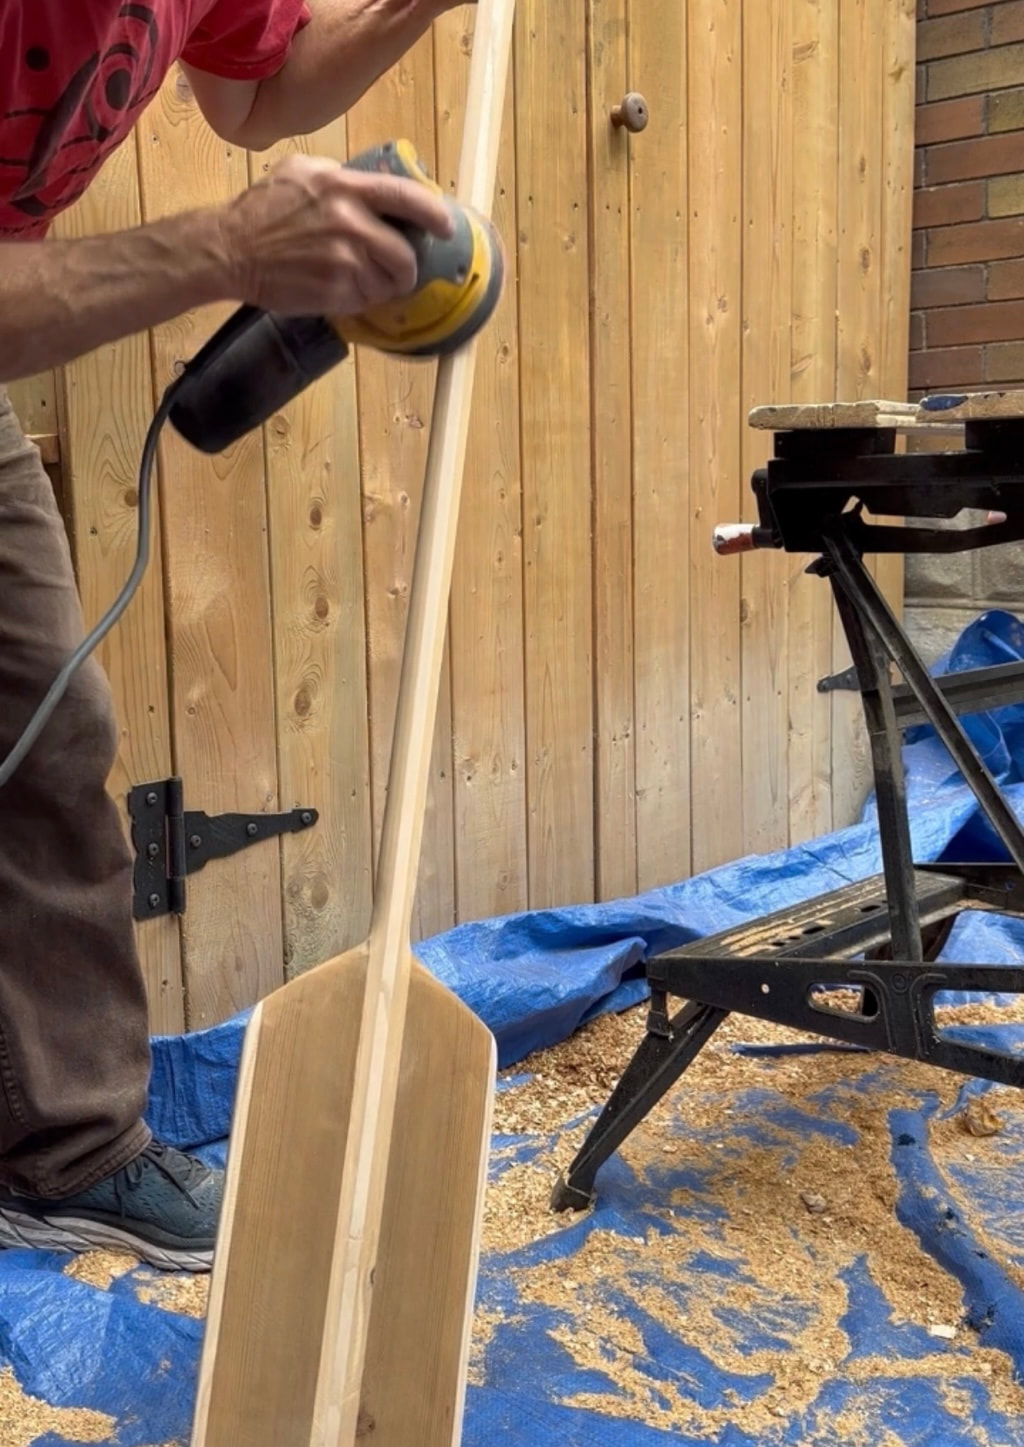
I was using a bent paddle and wanted a straight paddle that would facilitate better steering. I found a leftover piece of ash that was not needed for gunwales, a nice cedar 2x4 I had originally saved for a greenland paddle, and some shorter pieces of cedar for the blade. It took one hour to prepare the wood and glue it up. The process involved cutting and planning the wood down to size and sanding them smooth to 120 grit followed by the glue up. I put a piece of parchment paper under the blade portion of the glue up to keep the glue off of the clamps. For the handle I included a bit of walnut. I would let the Titebond III dry overnight. The next day I took another hour to work it down. Tools used included a hand held power planer, bench attached belt sander, aggressive grinder bit, orbital sander and 120 grit foam pads. A blue tarp on the ground made cleanup much quicker. Some wood dust (including cedar and ash) are carcinogenic so protection is essential. I applied a quick coat of tung oil with a rag and placed it in the sun to dry. I put the rag in a safe place so it would not start a fire. I would later coat the new paddle with 3 light coats of Spar Urethane. I was ok with losing a bit of the comfortable feel that natural wood would allow because I enjoyed the look, especially the contrasting colours of the wood. I even applied my new little brand. Update Feb, 2024. The rest of my paddle designs can be found on the Paddle Build page in the above menu or by clicking here. My paddle page will continue to evolve as I design new paddles. |
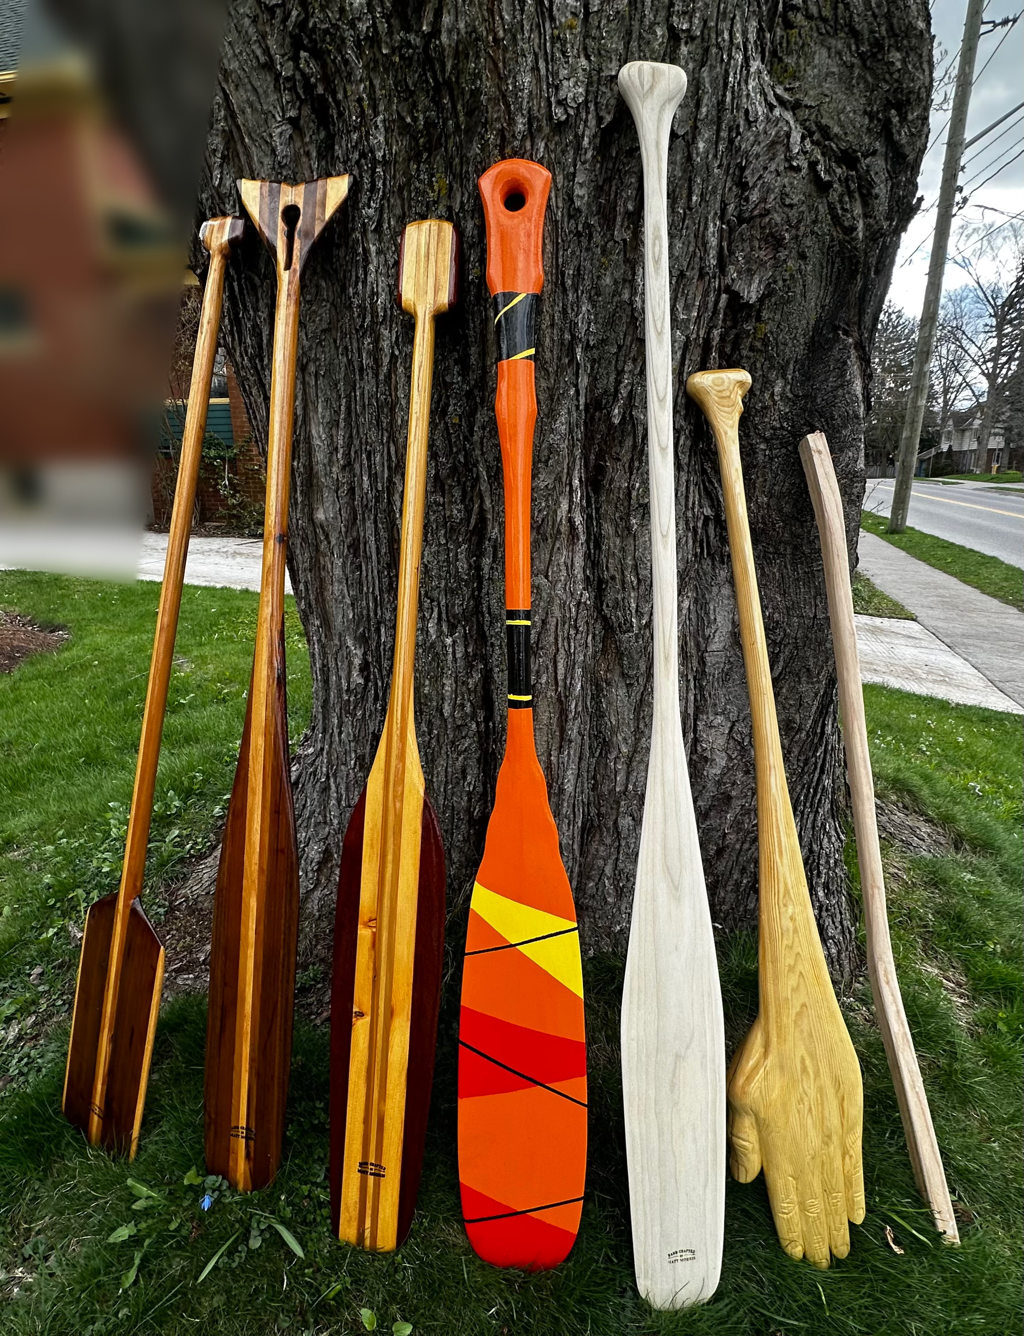
Feel free to click this picture to jump to the main paddle page for my site.
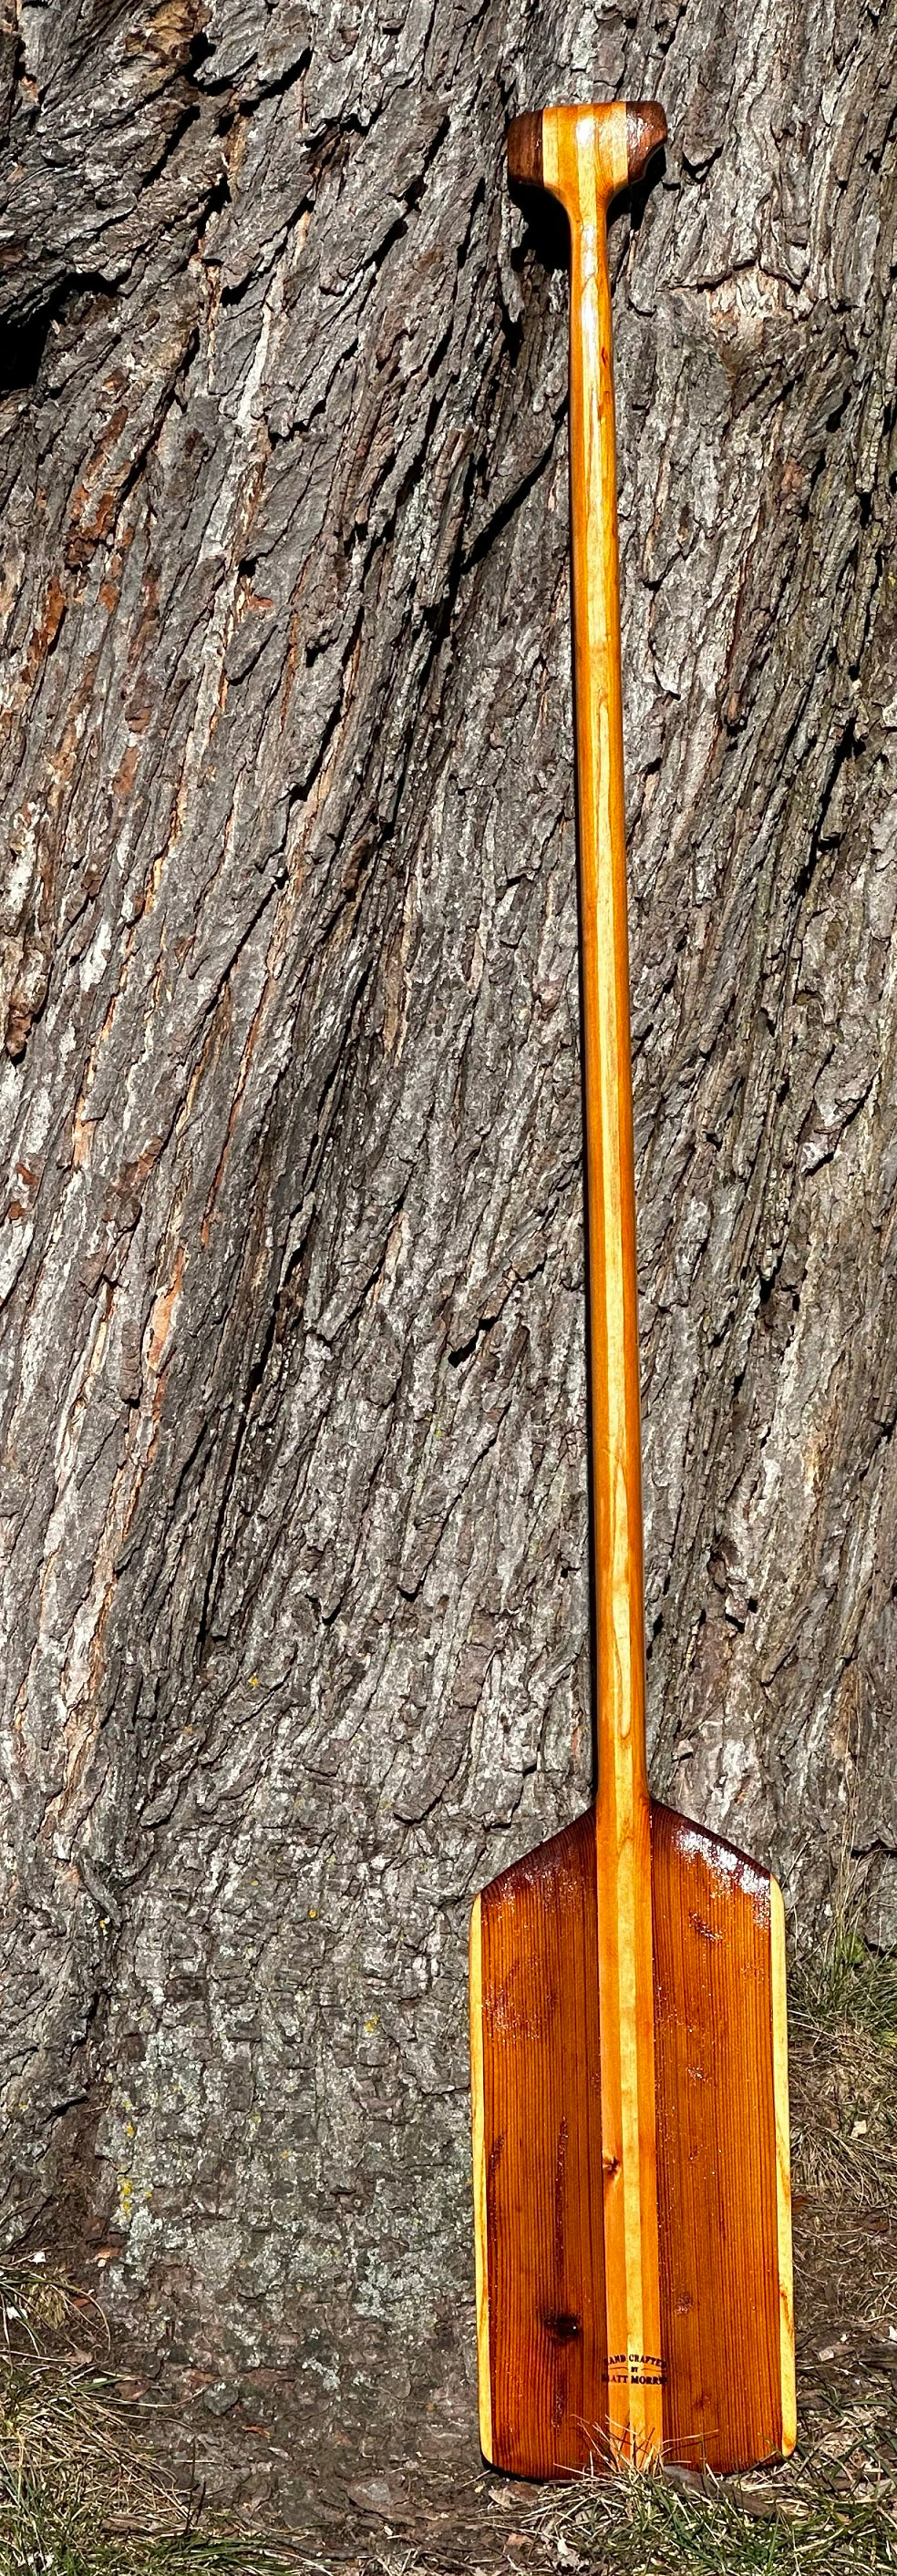
A quick paddle build for Pheather.
|
|
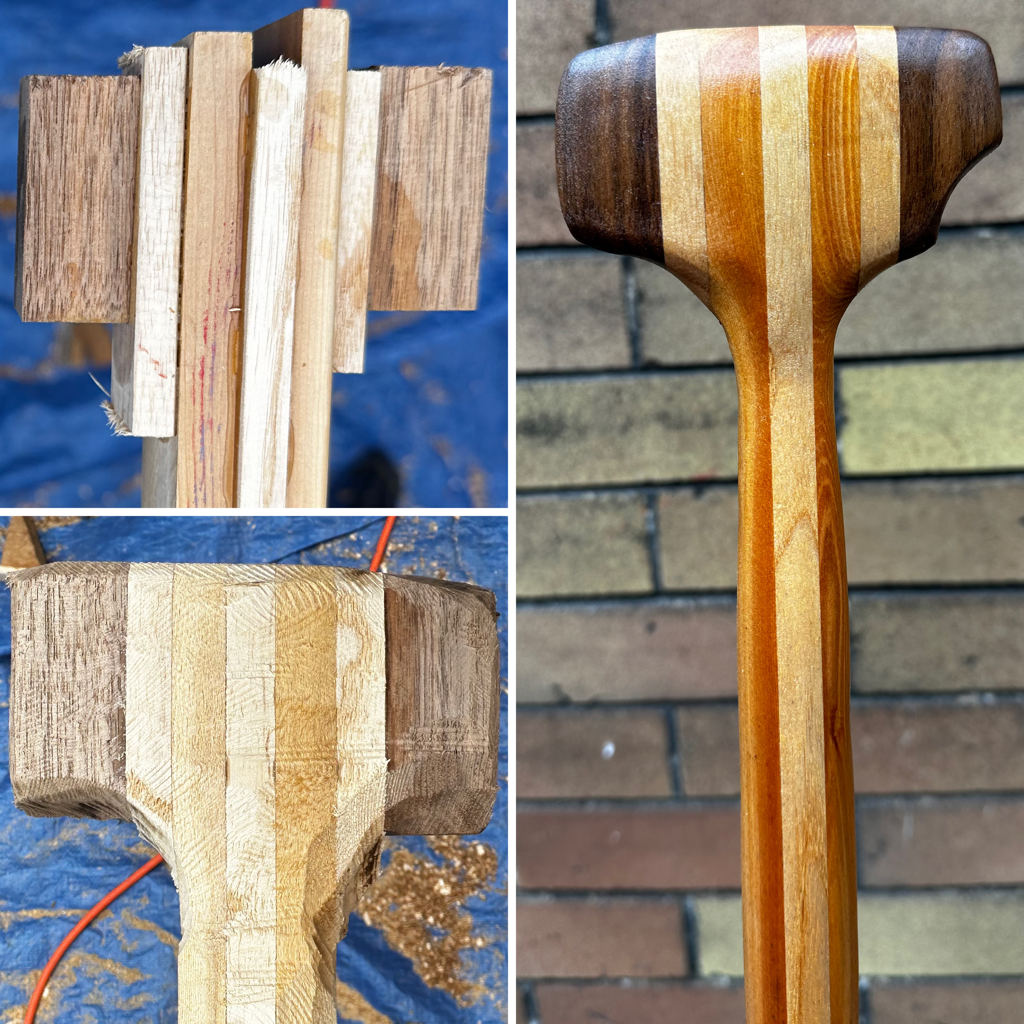
I like the idea of an asymmetrical grip that allows the user to mix it up. The idea was confirmed as a good one when I read pg 27 of the famous paddle creation book called “Canoe Paddles” by Graham Warren and David Gidmark.
|
Big orange wheels
|
Sunday October 22, 2023.
It was time to instsall the new 90mm (3.5") longboard wheels. The goal was even more stability, quieter ride and an ability to ride over railway tracks. When I received them I also realised they were much softer which would provide a little bit more suspension, thus saving the boat from banging away as I rode to little lakes. After reviewing some YouTube videos of how to install skateboard wheel bearings I took off the little skate board wheels and installed the big beautiful orange longboard wheels. The real test would be how the boat rolled over railway tracks. I had received a new 6” swivel and have plans to install it, but decided to run with the existing 4” swivel to allow a quicker test of the new wheels. So I banged the 4” swivel flat again and installed it with beefier screws. Off I went for a total trip that would take 53 minutes. I rode down the trail and noticed that it was the windiest day I’d ever ridden with a boat. Once I got to the railway tracks I dismounted and decided to walk the bike over the tracks as I watched to observe how the new orange wheels performed. Success! The next test will attempt a slow ride over the track. And approaching at an angle could be helpful too, although with such a long rig, getting any angle will be a challenge. Maybe I should just walk it over each time. With this success I decided to back up the rig and get a picture with the wheel sitting on the track. Just as I lined up the shot, a great wind came through and blew the whole rig over. Disaster! I checked the swivel and two (opposing) screws of the 4 were still intact--I decided to proceed. I had a great paddle and said hello to the resident swans Otis and Ophelia. I then hooked the canoe back onto the bike and rode carefully home. Later I would install a new swivel and vowed to keep my weight on the bike while travelling. |
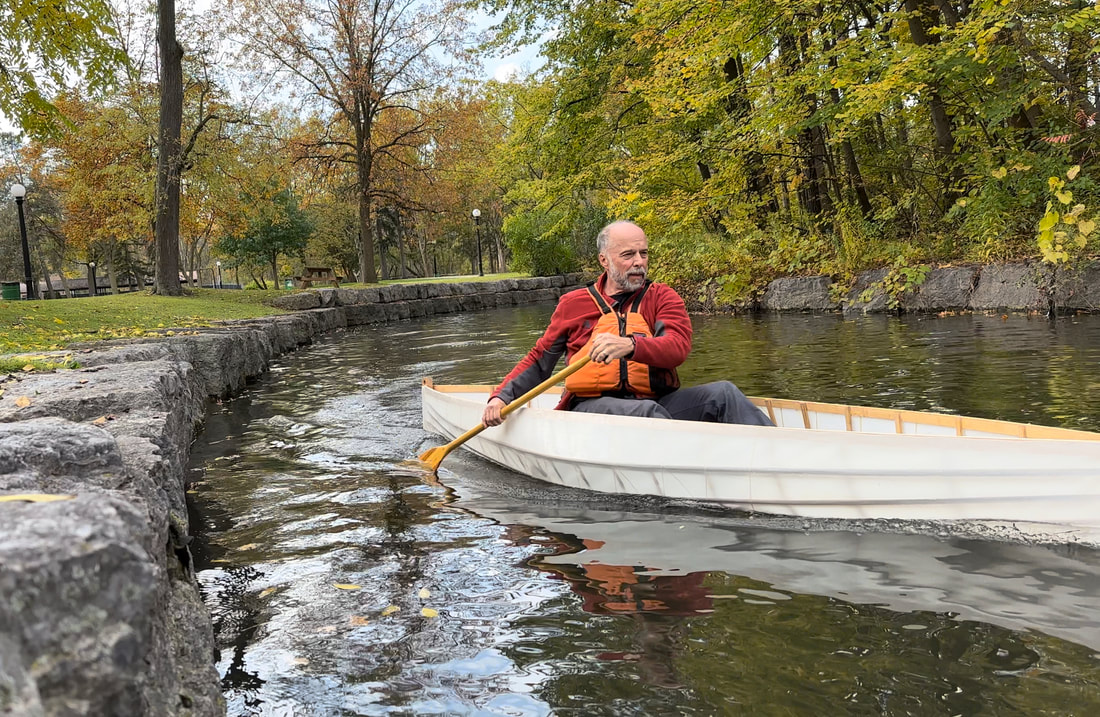
Photoshoot at Silver Lake in Waterloo.
Would you consider paddling in an urban environment? It can be a meditative experience.
Disaster!
It’s important to show disasters.
It’s part of the learning process.
|
Stern and Bow decks
Thursday, October 26, 2023
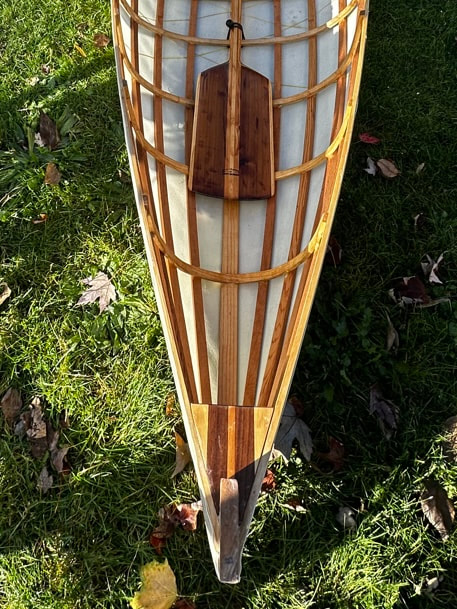
I always planned on building decks for the bow and stern.
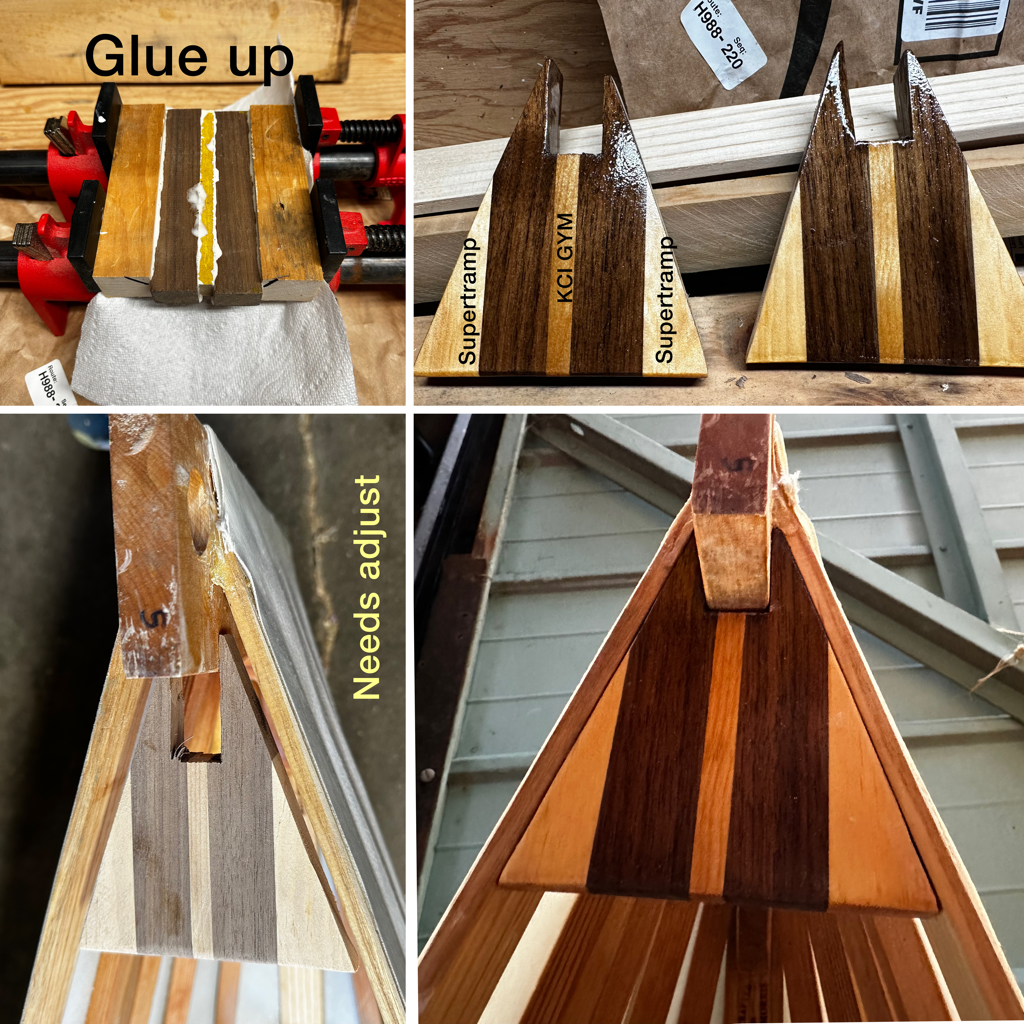
And why not have some fun with it? So I found an old piece of a gym floor (that had been replaced) at a local high school (KWC&VS) where I taught for years. I also found some very old pine that came off a front porch that was replaced recently just down the hill on our street. And the coolest part of the story is that the rock group Supertramp used to stay at this home when they were performing locally.
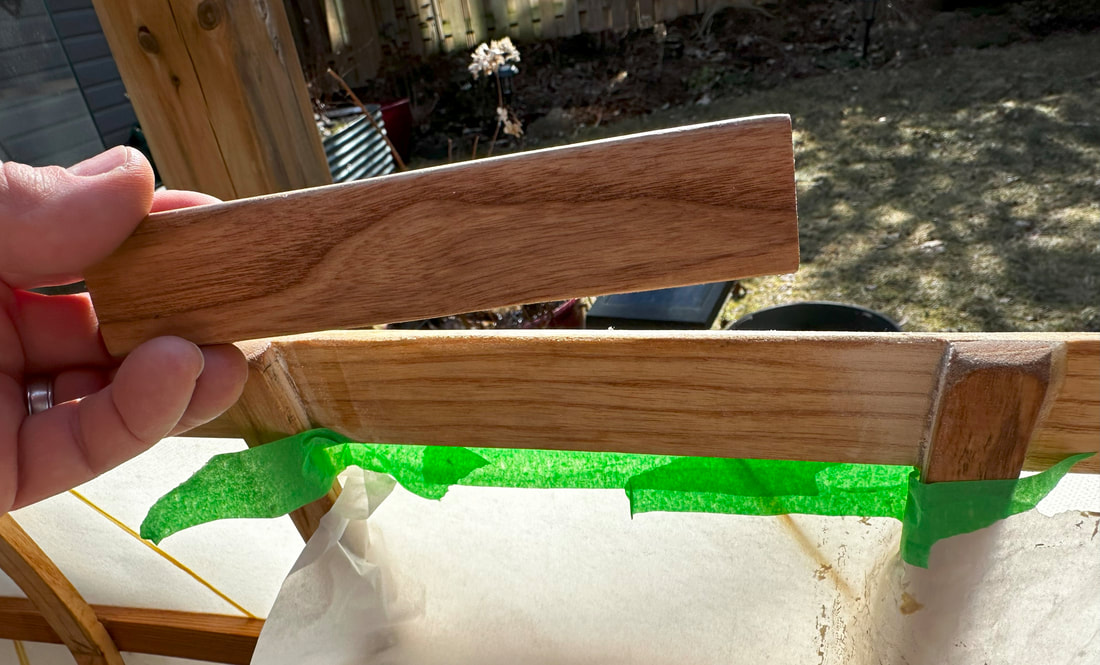
I glued them up and got them drying. Meanwhile I got an old piece of heavy paper and starting making the two templates that would follow the very specific and somewhat challenging shape. The notch for the canoe stem would require careful work.
The next day I began the fit process. It took many checks but I finally had a fit. I applied Titebond III and a clamp. The decks will add important strength to the boat and look sharp.
I better weigh the boat again! I might be 21lbs!
And wherever I go, Supertramp will be with me!
Maybe I’ll paddle to Buffalo and have “Breakfast in America”. Maybe I’m a “Dreamer” thinking this would be possible. I will definitely “Take the Long Way Home”.
I always planned on building decks for the bow and stern.
And why not have some fun with it? So I found an old piece of a gym floor (that had been replaced) at a local high school (KWC&VS) where I taught for years. I also found some very old pine that came off a front porch that was replaced recently just down the hill on our street. And the coolest part of the story is that the rock group Supertramp used to stay at this home when they were performing locally.
I glued them up and got them drying. Meanwhile I got an old piece of heavy paper and starting making the two templates that would follow the very specific and somewhat challenging shape. The notch for the canoe stem would require careful work.
The next day I began the fit process. It took many checks but I finally had a fit. I applied Titebond III and a clamp. The decks will add important strength to the boat and look sharp.
I better weigh the boat again! I might be 21lbs!
And wherever I go, Supertramp will be with me!
Maybe I’ll paddle to Buffalo and have “Breakfast in America”. Maybe I’m a “Dreamer” thinking this would be possible. I will definitely “Take the Long Way Home”.
New seat
Monday, October 30, 2023. And Tuesday.
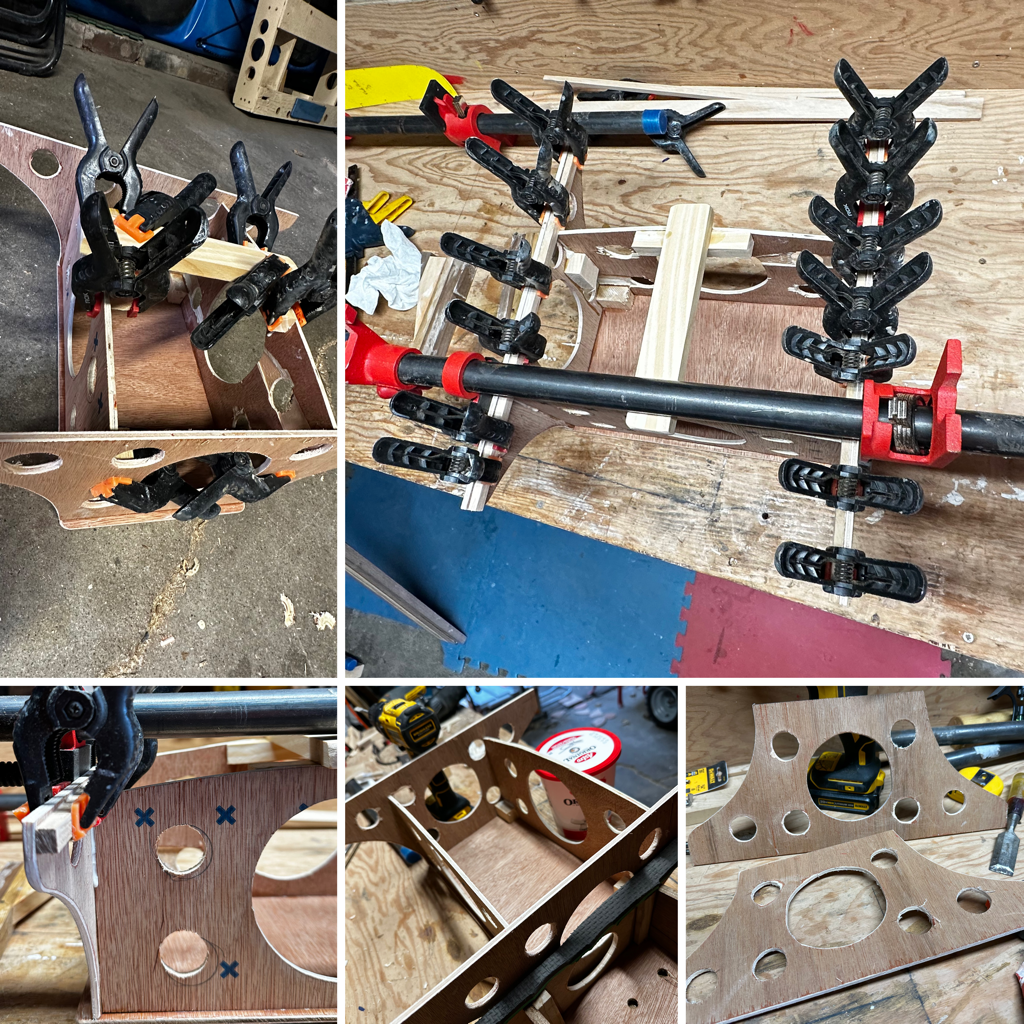
I had tested the boat with various temporary seats. Everything from my first test seat at 8” down to 4”. I decided that 6” with a piece of foam for comfort would be the final seat design. I got one 4’x4’ piece of 5.2mm Lauan underlayment and started outlining the seat including lots of holes to reduce weight. The holes would also allow access to storage for the safety rope and bailer under the seat.
I did the final assembly on Wednesday, November 1, 2023. It ended up being 7” high and in the water test it was perfect. I zip tied it into the boat so I’ll never have to think about it. You know what I want to say about zip ties….
And I realised I only needed one ball bungee to hold the paddle in the boat during travel because I could slot the paddle grip into the hole in the seat.
Initial glue up.
|
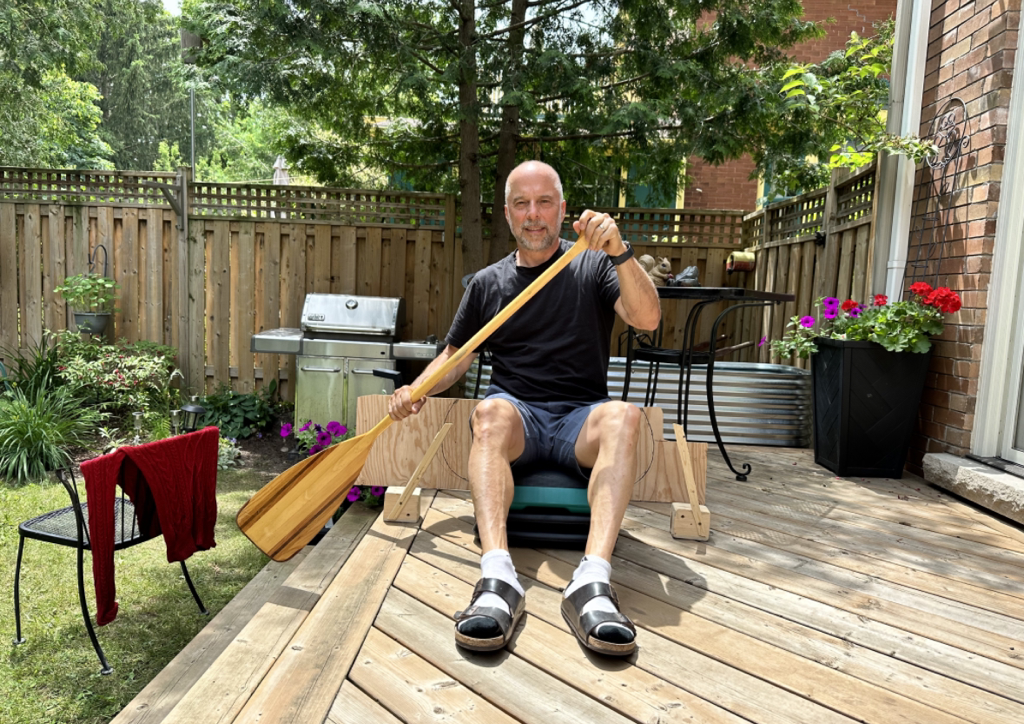
During the planning phase I mocked up the canoe profile and then sat at different heights. I wanted to consider comfort and paddle stroke ergonomics. I decided that 8” would be ideal for the first test. If you look closely, you can see my little sticks attached to blocks which are meant to mimic the edge of the boat. What would be my paddling experience?
|
The original 8” test seat. A bit tippy but I was surprised how quickly I was able to adjust.
|
Notice just one ball bungee needed to secure the paddle to the boat.
Quick release longboard wheels
|
On October 31, 2023 I installed two quick release pins into the stern stem of the canoe. Now if I want to remove the wheels it will be a quick process. And if I leave the wheels on they will be behind me which some would say is more attractive.
|
|
Thwart!
|
March, 2024.
I decided that I needed at least one thwart. The boat needed a bit of structure and the thwart would help keep the tumblehome in where it needed to be. I was concerned the boat would start to relax and splay out over time. So I got to work shaping a maple thwart and then gluing some more wood into the position on the gunwale where the thwart would be attached. I also realised this action would add a little weight to the boat! I should put it on the scale and see where it sits! |
|
Skin repair
|
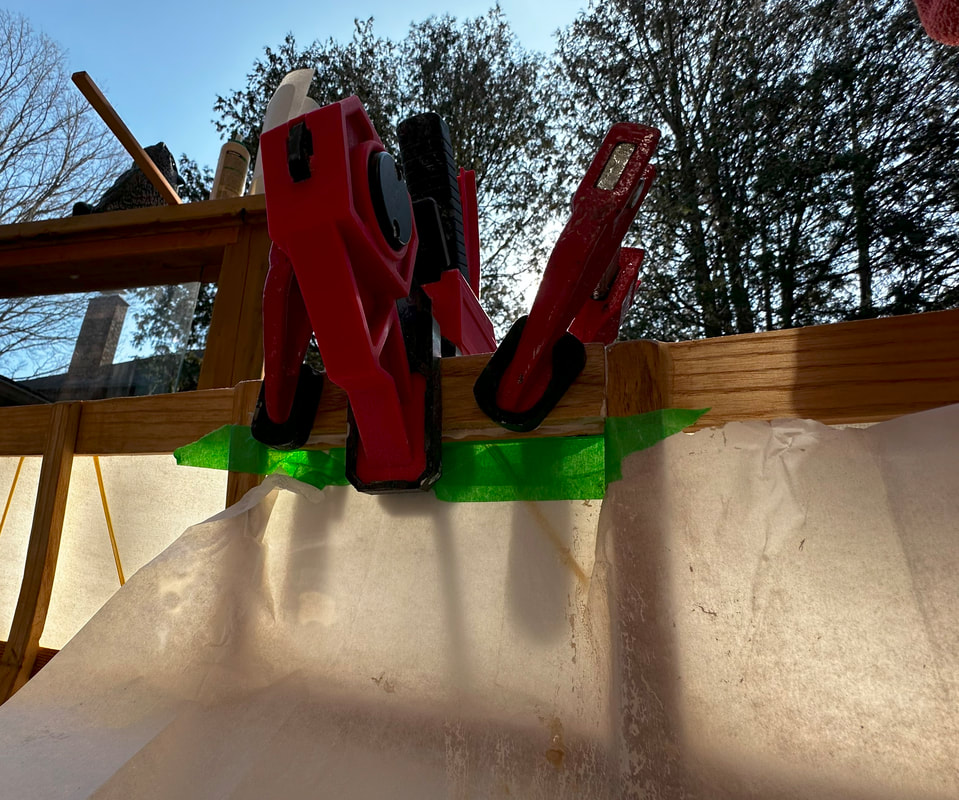
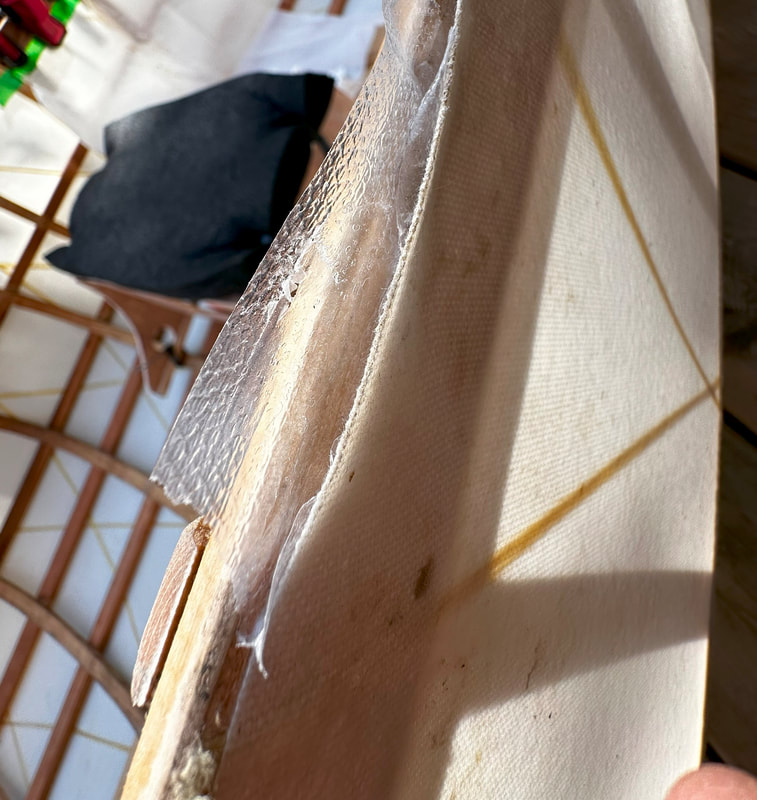
March, 2024.
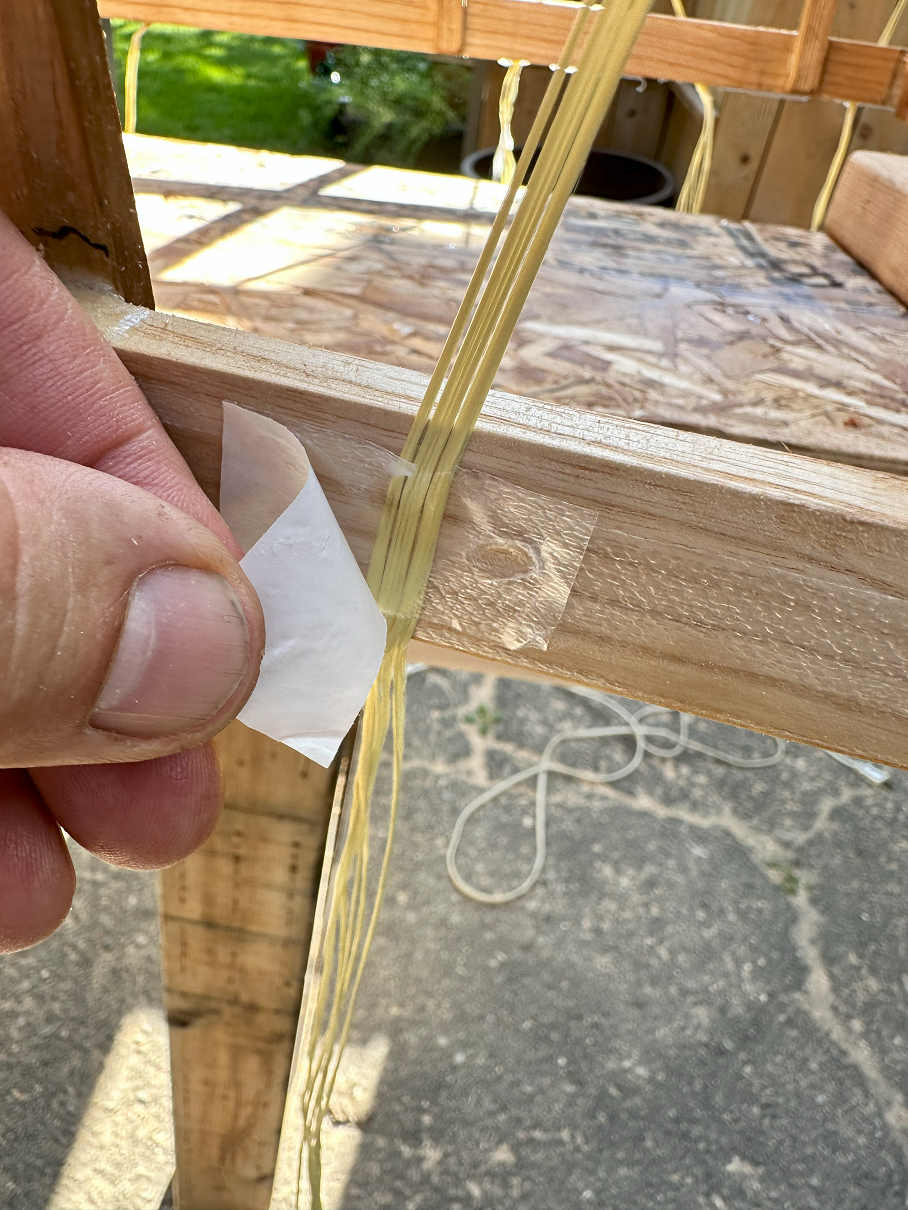
I was starting to see a little bit of skin separation from the top of the gunwhale. I realise now that my initial application of HeatNbond glue tape during the build did not meet the top edge of the gunwale. So I cut a piece of heatnbond tape and then peeled off the sticky portion, folded it into the gap and put the iron to it. Success! |
|
If you have read this far I hope you enjoyed your read. Let me know what you think.
I'll have more updates on my Instagram account: snowbankproductions
If you would like to read the story of my UB1000 rowboat or want to check out my many paddle builds, simply click the menu at the top of this page.
Cheers!
I'll have more updates on my Instagram account: snowbankproductions
If you would like to read the story of my UB1000 rowboat or want to check out my many paddle builds, simply click the menu at the top of this page.
Cheers!
